This is final lesson of the Simple CodeIgniter App course, which walks you through the creation of your first PHP web application using the CodeIgniter framework.
Last week we configured our todos index view to display all of our todos.
And if you worked through last week’s task, you also began configuring the app to handle todo completions. Let’s pick up there, and finish implementing the completion functionality.
(Note: If you completed last week’s task already, you already have a head-start! Just follow along and use the very first sections to double-check your work.)
Completing todos
This is what our plan of action entails:
- Adding checkboxes to our todo list items, to designate whether or not they’ve been completed
- Wrapping our todos list in a
formelement - Setting up the form to, when submitted, send information to a new action in our
Todoscontroller
And as a refresher, below is a mockup of the completed todos index page.
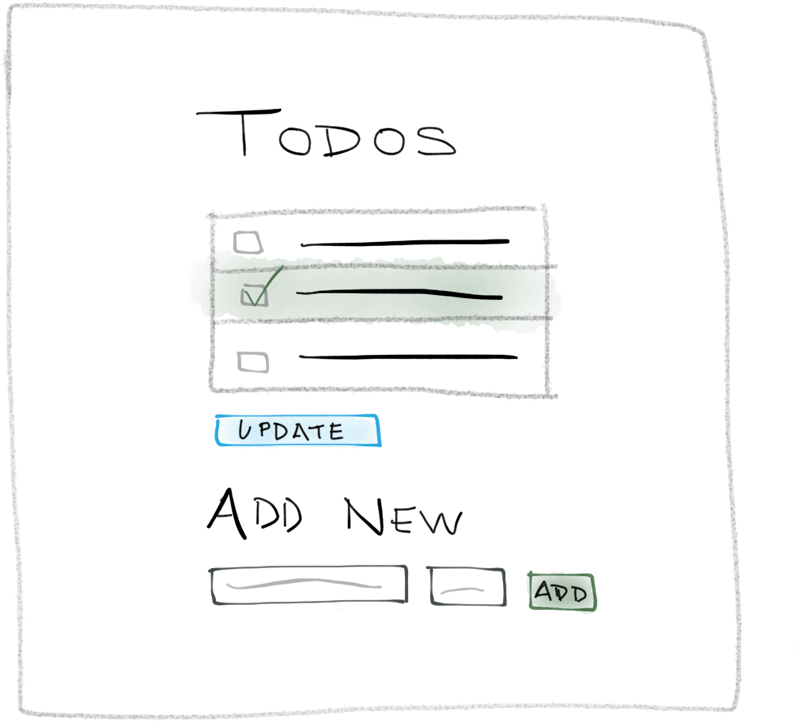
Mockup of the completed Todos index page
Autoloading the CodeIgniter (CI) form helper
In order to render our form’s elements, we’ll use CI’s form helper. But in order to do that, we need to autoload it, as we’ve done with other code modules in the past.
Alter the application/config/autoload.php configuration file to autoload the form helper, as shown:
.
.
.
$autoload['helper'] = array('form');
.
.
.
Configuring our view
Adding checkboxes to the todo list items
We’ll be using checkboxes in order to designate whether or not a todo item has been completed.
CI’s form helper provides us with a bunch of useful functions, including a whole set for rendering different form inputs — text inputs, dropdowns, radio buttons, etc.
Let’s utilize one of those function to add the checkboxes to our todo items. Go ahead and alter the codeinside of the foreach loop in our index view as shown here:
.
.
.
<div class="list-group-item clearfix">
  <?php
  echo form_checkbox('completed', $todo->id, $todo->completed);
  ?>
  <?php echo $todo->task; ?>
</div>
.
.
.
You can see the call to the new form_checkbox function, provided by CI’s form helper, which accepts three parameters:
The name of the input;
the value of the input; and
a true/false value designating whether or not the checkbox should be checked, right off the bat.
So, for example, say we were calling form_checkbox for our first todo item — whose id is 1 — and let’s say that it was already marked as completed in our database — meaning its completed value is 1 (i.e.true). That would mean we would essentially be making the following call:
echo form_checkbox('completed', 1, true);
which would render:
<input type="checkbox" name="completed" value="1" checked>
You can see that the input element’s name is "completed", its value is 1, and it’s designated aschecked, since the todo’s completed value was set to 1 (i.e. true).
But why use its id for the value?
The value is not shown to the user; it’s the value that we’ll be able to access in our app’s code when the form is submitted. And since we will ultimately need the todos’ id values when writing the code to update their completion statuses in our database, we assign each todo’s id as the checkbox element’s value.
Also, note that every form input must have a name attribute value. A form input’s name attribute is used to retrieve its value when a form is submitted, as we’ll see in just a little while.
We’ll connect the dots a bit when we work on actually updating todos in our database, so don’t worry if that wasn’t all crystal clear. We’ll be revisiting it shortly.
Testing the checkboxes
After you’ve added the code to display the checkboxes, log into phpMyAdmin and manually change thecompleted values of a few of the todos in your database. Then refresh the todos index page in your browser and make sure that the checkboxes on your page are checked/unchecked accordingly, based on their assigned completed values.
Adding our form and submit button elements
The last step is to wrap our todos list in a form element. That will allow us to submit the form and send data to our controller, which will, in turn, allow us to update the completed statuses of our todos.
Go ahead and modify the code in the index view as shown below, wrapping the todos list in a form:
<?php echo form_open('todos/update_completed'); ?>

<h1>Todos</h1>
<div class="list-group">
  .
  .
  .
</div>

<button type="submit" class="btn btn-primary">Update</button>

<?php echo form_close(); ?>
You’ll notice three additions: the calls to form_open and form_close, and the new submit buttonelement.
The button will simply allow us to submit the form.
The calls to form_open and form_close render the opening and closing form element HTML tags. You’ll also notice that form_open accepts one argument: a string designating the URL it should submit to, in the following format:
form_open('[controller]/[action]')
So our call:
form_open('todos/update_completed')
tells the form to submit to the Todos controller’s update_completed action.
But right now, if you submit the form, you’ll see a “Page Not Found” error. That’s because we still need to set up our new update_completed action that our form is submitting to.
Handling form submissions
Initially, let’s establish the update_completed action in our Todos controller with some code to print out messages regarding the submitted form values, as shown here:
<?php if ( ! defined('BASEPATH')) exit('No direct script access allowed');

class Todos extends CI_Controller {
  .
  .
  .
  public function index()
  {
    .
    .
    .
  }

  public function update_completed() {
    $completed_todos = $this->input->post('completed');
    foreach ($completed_todos as $todo_id) {
      echo 'The todo with id = ' . $todo_id
        . ' is marked as completed.<br>';
    }
  }


}
This will allow us to get a feel for how we receive the form data that was submitted.
Accessing form data in a controller
Remember when we discussed that form inputs must have name attribute values because that’s how they’re accessed in the server-side code? Here we see that in action.
In CI, you can access submitted form values using CI’s built-in input class. We can use the post method to retrieve specific pieces of form data. Notice how we’ve passed it ‘completed’, designating that we’d like to retrieve the values of our ‘completed’ checkboxes.
If you’re paying close attention, you may be wondering why we’re using ‘completed’ instead of ‘completed’, which we used when rendering the checkboxes. When creating a set of checkboxes that share the same name, you need to use the syntax to designate that you may potentially be submitting multiple values associated with the same name. But when retrieving those values, you drop the , and just use the core name.
And since we are (potentially) submitting multiple values — based on how many checkboxes are checked — $completed_todos will contain an array of all of the ids of the todos that were checked. As mentioned earlier, the reason it contains the todos’ ids is because that’s what we assigned to our checkboxes’ value attributes.
Now, if you revisit the todos index page, check a few checkboxes, and submit the form, you should see a page with messages designating the ids of the todos that you checked, similar to the one shown below.
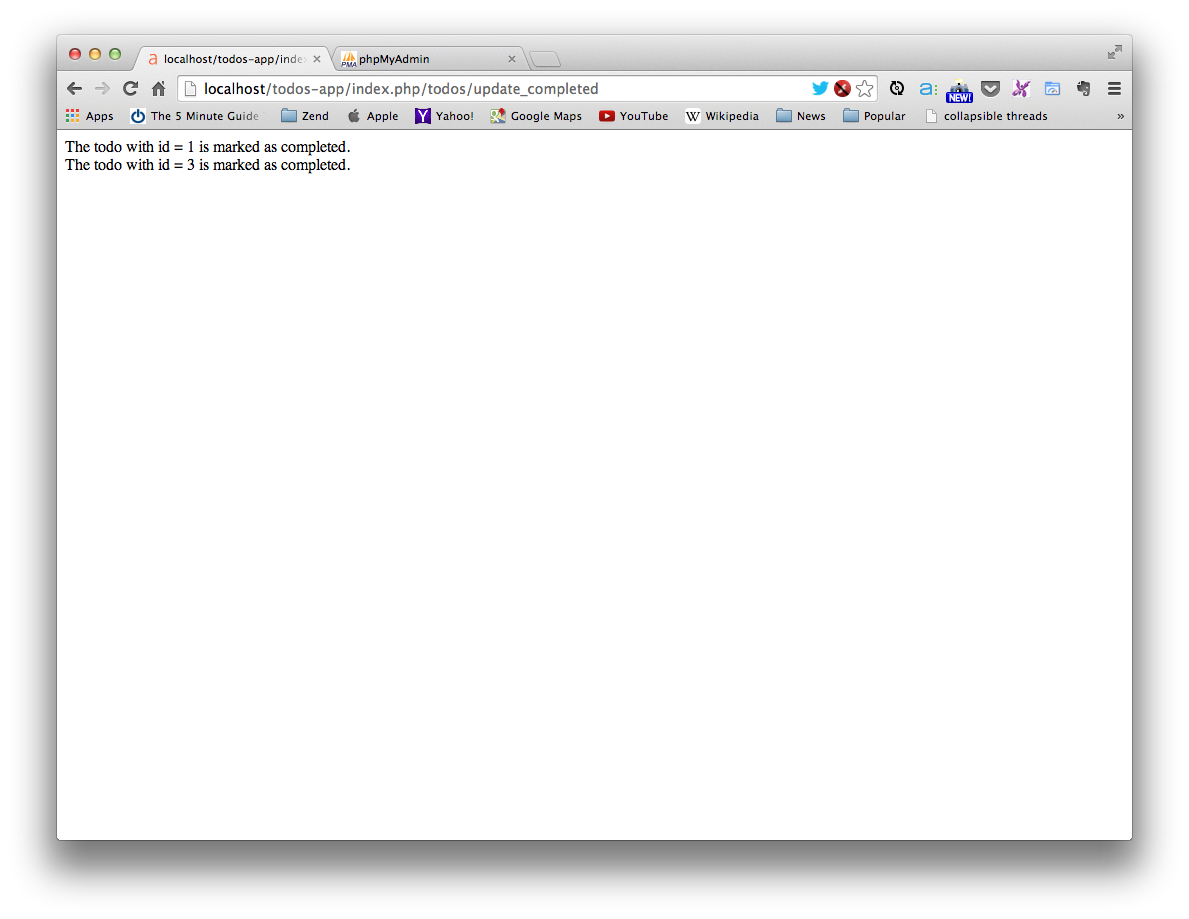
Messages using the submitted form data to designate the checked todos
Bravo! So far, so good.
Handling database updates in our model
Now that we know how to access form data within a controller action, we can begin to configure our model to allow us to use that data to update the todo entries in our database. We’ll then be leveraging our model from within the update_completed controller action to perform the updates.
And in fact, the function that we’ll use to handle all of these database updates is deceivingly simple. Go ahead and add the following update_entries function to the Todo_model:
<?php if ( ! defined('BASEPATH')) exit('No direct script access allowed');


class Todo_model extends CI_Model {
  .
  .
  .
  function update_entries($update_info, $update_criteria = array()) {
    //
    // Update the entries in the todos table:
    //
    // 1. only update the entries that match
    //    the specifications in $update_criteria
    //    (or if $update_criteria is an empty array, update ALL entries)
    //
    // 2. and update only the fields designated in $update_info
    //
    $this->db->update('todos', $update_info, $update_criteria);
  }


}
Note that there’s just one line of actual code in the function! I added the comments explaining the functionality. (Go ahead and read through them now, and then we’ll go through some examples.)
Let’s walk through a few examples. Let’s say we wanted to update ALL of the todo entries, setting all of their completed values to 0. We would use the following:
$update_info = array('completed' => 0);
update_entries($update_info);
That’s it! You can see the use of an optional parameter with $update_criteria in this function:
function update_entries($update_info, $update_criteria = array()) {
What that says is, if $update_criteria is not provided when calling the function, automatically assume it to be an empty array.
And, as explained in the comments, when $update_criteria is empty, all entries in the database table are updated.
Now let’s say we wanted to update a specific todo, say, setting the todo with an id of 3 to have acompleted value of 1. We would do the following:
$update_info = array('completed' => 1);
$update_criteria = array('id' => 3);
update_entries($update_info, $update_criteria);
That’s all there is to it! Now it’s time to take almost those same exact examples and finish up our controller’s update_entries action.
Running updates from our controller
Moving back to our controller, our update_completed function should ultimately do three things (in this order):
- Set all todo entries as not completed
- Set the designated (i.e. the todos accessed from our form checkboxes’ data) todos as completed
- Redirect back to the todos index page
Go ahead and update the update_completed action so it accomplishes just that:
.
.
.
public function update_completed() {
  // 1. Set all todos as *not* completed
  $update_not_completed = array('completed' => 0);
  $this->Todo_model->update_entries($update_not_completed);


  // 2. Update the designated todos as completed
  $completed_todos = $this->input->post('completed');
  foreach ($completed_todos as $todo_id) {
    $update_completed = array('completed' => 1);
    $update_criteria = array('id' => $todo_id);
    $this->Todo_model->update_entries($update_completed, $update_criteria);
  }


  // 3. Redirect back to our index page
  $this->load->helper('url');
  redirect('todos/index');
}
.
.
.
First, you see the call to our Todo_model — remember that we access its functionality using the$this->Todo_model within our controller — to set all of the todos to be not completed, just as in our previous example.
Second, we use our existing foreach loop, making another call to update_entries for each completed todo, passing in the todo’s id within the criteria array. (Very similar to the second example we discussed above.)
And finally, we redirect back to the todos index page. Note that this requires CI’s URL helper, so we load it up before calling the redirect function.
Give it a go
Time for the fun part — testing everything out! Go ahead an return to your todos index page, check a few checkboxes, and click “Update”. You should be sent right back to the index page, but here’s the important part: the checkboxes that you check should remain checked, as shown below.
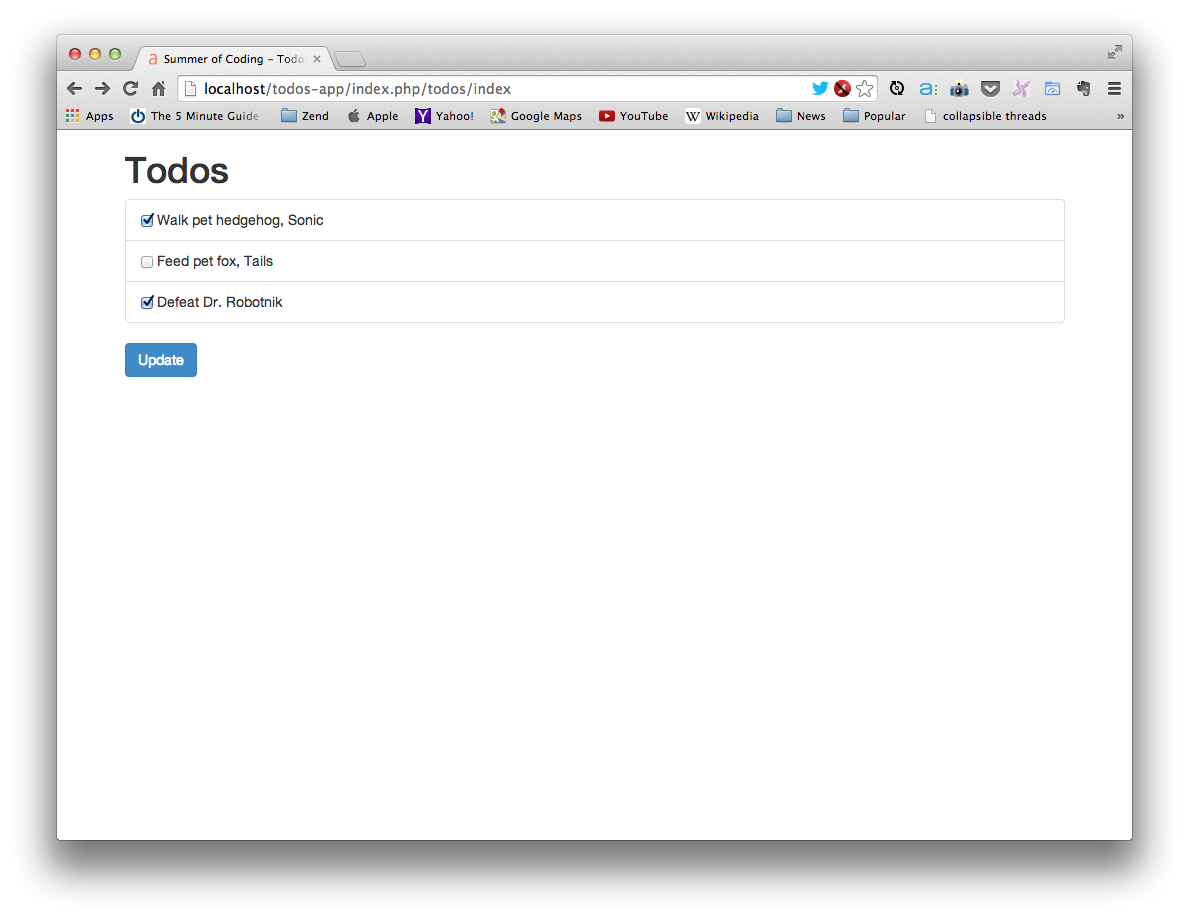
Todos index page with the saved, checked todos
Double-check the entries in your database, ensuring that their completed values are being updated properly.
Nice work!
Give yourself a huge pat on the back for making it all this way!
You’ve now personally built a fully-functioning web app, from the ground up. Sure, web apps can grow to be much larger and much more complex from here, but you now have a grasp on all of the fundamental building blocks.
Suffice it to say, if you’ve been following along throughout the entire Build a Simple CodeIgniter App, you’ve certainly learned a whole bunch of new things.
Build a Simple CodeIgniter App Final Exam
(Plus a Special Offer)
Well, this is it — your last task. The “Final Exam”.
Again, I sincerely hope you’ve enjoyed working through this course as much as I’ve enjoying putting it together.
This Final Exam task is designed to be much more challenging and in-depth than the previous week’s tasks. But, with that said, if you’ve been following along throughout the Build a Simple CodeIgniter App, you’ve acquired all of the skills you’ll need to in order to complete it. And since it is much more in-depth, finishing it will be that much more rewarding. That much sweeter.
Some guidelines:
- Work through the task, but feel free to work with others for support. If you have questions or get stuck, you can email me for assistance. (Or ask a friend!)
- Once you’ve completed the task, email me a .zip file with your completed code. I’ll check it over, and send you any feedback.
THE OFFER:
If and when you send me your completed app, as a reward, I’ll send you:
- A certificate designating your completion of the Build a Simple CodeIgniter App course.
- A special 25% off discount code to be used towards future purchases of my learning materials.
Without further adieu, here’s the task…
The Final Exam:
Adding Todos
Your task for the Final Exam is to implement the ability to add new todo items in your app.
I’ll go through each step, giving you guidelines and hints that will aid you in completing them.
The steps:
Note: They don’t necessary need to be completed in this order, but it will likely be the most logical progression.
1. Add a form for creating todos
- Add the new form to the bottom of your todos
indexview (below the current form that surrounds the todos list). - It should contain three elements: a text input for the task text; a dropdown or text input for the order; and a submit button.
- Have the form submit to a new action,
create, in theTodoscontroller.
2. Create the initial controller action to handle the form submissions
- Define a new action,
create, as mentioned above, to theTodoscontroller. - Not required, but recommended: It would likely be useful at this point to add some
echostatements and test submitting your form to make sure you’re able to successfully retrieve your form data. - Leave it at this for now. You’ll come back in a few steps to finish it.
3. Add a model function for inserting todos
- Define a new
insert_entryfunction in theTodo_modelthat will be used to insert todos into the database. - Your function needs to accept the pieces of data required for creating a new todo.
- Reference the CodeIgniter database documentation for information on how to insert entries into your database.
4. Complete your controller action
Your controller action should ultimately:
- retrieve your new todo’s information from the submitted form data;
- use your model’s
insert_entryfunction, passing along the todo’s information, to create the new todo in the database (remember…you’ll also need to include acompletedvalue, as it’s required when adding entries to the database); - redirect back to the todos index page (where the new todo should be shown).
BONUS: Form Validation
(It’s good practice to always validate your form data, although this is not required to complete the Final Exam.)
Reference the CodeIgniter form validation documentation to implement form validation when submitting your form. You will need to add code to both your controller — to perform the validations — and to your view — to display any error messages.