Laravel applications follow the traditional Model-View-Controller design pattern, where you use:
- Controllers to handle user requests and retrieve data, by leveraging Models
- Models to interact with your database and retrieve your objects’ information
- Views to render pages
Additionally, routes are used to map URLs to designated controller actions, as shown below.
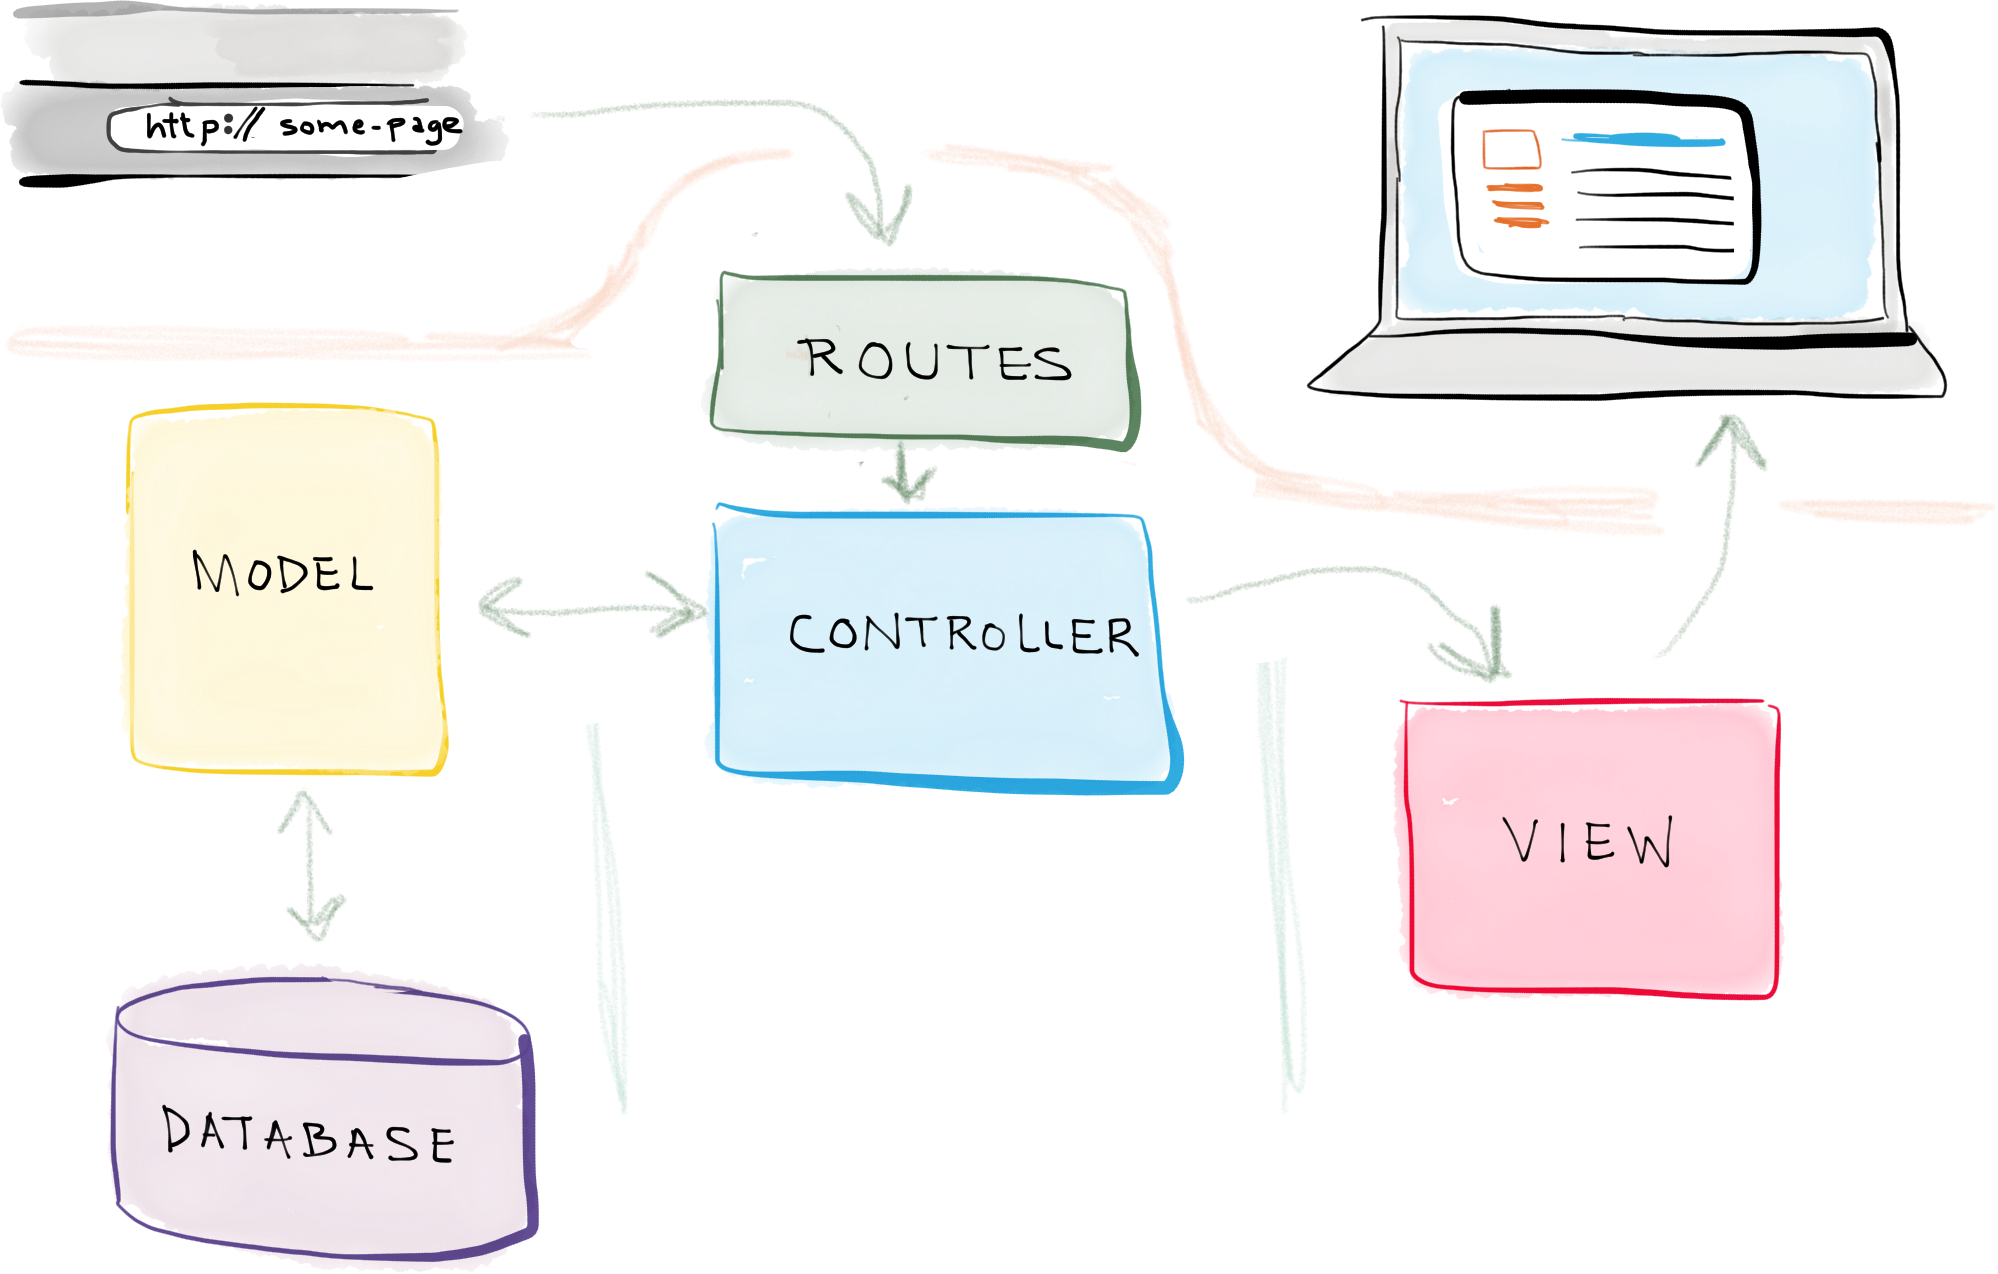
The full MVC request cycle in a Laravel 5 application
So…
- A request is made — say, when a user enters a URL associated with your application.
- A route associated with that URL maps the URL to a controller action.
- That controller action leverages the necessary model(s) to retrieve information from the database, and then passes that data off to a view.
- And that view renders the final page.
I like to say that an MVC application is a lot like playing with Legos.
And building one using Laravel 5 is a breeze.
Building a sample application
For the sake of demonstration, I’m going to walk you through the process of building the start of a sample Laravel 5 application with all the MVC components — a model, a view, and a controller.
So, let’s say you wanted to build an application dealing with cars…
The Model
We’ll start by creating a model, to represent a Car.
Laravel comes with a fantastic, built-in command line interface, the Artisan CLI, which provides you with a bunch of useful commands to help you build your application.
So, fire up your command line (and connect to your Homestead virtual machine, if you’re using Laravel Homestead), move into your application’s main directory, and run the following command to generate a new Car model:
$ php artisan make:model Car --migration
Models are all stored in the main app directory, so that command will generate an app/Car.php model file with the following code:
<?php

namespace App;

use Illuminate\Database\Eloquent\Model;

class Car extends Model
{
    //
}
Due to Laravel’s built-in model functionality, just by creating an empty model class, Laravel will assume that this model is associated with a database table named cars.
And, actually, by supplying that --migration option when generating the model, Laravel also generated a database migration file for creating that cars database table. The migration file is located at [timestamp]_create_cars_table.php and contains the following code:
<?php

use Illuminate\Database\Schema\Blueprint;
use Illuminate\Database\Migrations\Migration;

class CreateCarsTable extends Migration
{
    /**
     * Run the migrations.
     *
     * @return void
     */
    public function up()
    {
        Schema::create('cars', function (Blueprint $table) {
            $table->increments('id');
            $table->timestamps();
        });
    }

    /**
     * Reverse the migrations.
     *
     * @return void
     */
    public function down()
    {
        Schema::drop('cars');
    }
}
(If you’re unfamiliar with the concept of database migrations, read more about how Laravel uses database migrations to help you manage your database from directly within your application. It’s awesome.)
All you have to do now is use Laravel’s Schema builder documentation to complete the migration file. So you could define a few additional columns to, say, store the cars’ make, model, and production date:
.
.
.
  Schema::create('cars', function (Blueprint $table) {
    $table->increments('id');
    $table->string('make');
    $table->string('model');
    $table->date('produced_on');
    $table->timestamps();
  });
.
.
.
And then you can run the migration to create the cars table using the following Artisan command:
$ php artisan migrate
With the database-related items addressed, we can now move on to create a controller.
cars database table.
The Controller
In Laravel, a type of object — such as a Car, in this case — is referred to as a resource.
Since it’s so common to build applications around resources, you can generate a resource controller — a controller to handle all requests related to a resource — using another simple Artisan command:
$ php artisan make:controller CarController
That will generate an app/Http/Controllers/CarController.php controller file with the following code:
<?php

namespace App\Http\Controllers;

use Illuminate\Http\Request;

use App\Http\Requests;
use App\Http\Controllers\Controller;

class CarController extends Controller
{
    /**
     * Display a listing of the resource.
     *
     * @return Response
     */
    public function index()
    {
        //
    }

    /**
     * Show the form for creating a new resource.
     *
     * @return Response
     */
    public function create()
    {
        //
    }

    /**
     * Store a newly created resource in storage.
     *
     * @return Response
     */
    public function store()
    {
        //
    }

    /**
     * Display the specified resource.
     *
     * @param  int  $id
     * @return Response
     */
    public function show($id)
    {
        //
    }

    /**
     * Show the form for editing the specified resource.
     *
     * @param  int  $id
     * @return Response
     */
    public function edit($id)
    {
        //
    }

    /**
     * Update the specified resource in storage.
     *
     * @param  int  $id
     * @return Response
     */
    public function update($id)
    {
        //
    }

    /**
     * Remove the specified resource from storage.
     *
     * @param  int  $id
     * @return Response
     */
    public function destroy($id)
    {
        //
    }
}
Note that it automatically generates a controller with all of the typical CRUD actions.
Now, we just need to define routes to associate URLs with all these controller actions.
The Routes
Again, since this is such a common scenario, you can define a single resource route, which creates routes for all of those resource controller actions.
In the routes configuration file — app/Http/routes.php — add the following to define a Car resource route:
Route::resource('cars', 'CarController');
That single route definition will define all of the routes related to our Car resource:
| Request Type | Path | Action | Route Name |
|---|---|---|---|
| GET | /cars |
index |
cars.index |
| GET | /cars/create |
create |
cars.create |
| POST | /cars |
store |
cars.store |
| GET | /cars/{car} |
show |
cars.show |
| GET | /cars/{car}/edit |
edit |
cars.edit |
| PUT/PATCH | /cars/{car} |
update |
cars.update |
| DELETE | /cars/{car} |
destroy |
cars.destroy |
Now, for the sake of example, let’s complete the implementation of the Show Car page.
The Controller’s show action
As per the previous table, the Show Car page will be accessible at http://app.url/cars/{car}. In this case, the {car} will, in fact, be an id of a car object in the database.
So, for example, the URL to view the car with an id of 1 would be http://app.url/cars/1.
In order to implement the Show Car page, in the controller’s show action, we need to:
- Use the
Carmodel to retrieve the designated Car object from the database. - Load a view for the Show Car page, and pass it the Car object retrieved from the database.
First, in order to access the Car model in the controller, we need to add a new use statement above the controller class:
.
.
.
use App\Car;

class CarController extends Controller
{
.
.
.
Then, we can complete the show action with the following code:
.
.
.
    public function show($id)
    {
      $car = Car::find($id);
      return view('cars.show', array('car' => $car));
    }
.
.
.
When we visit car 1’s URL — http://app.url/cars/1 — Laravel makes the 1 in the URL accessible via the $id variable in the show function, shown above.
And retrieving the car object using the Car model is as easy as calling Car::find and passing in that $id.
The view is then loaded using the view function and passing the name of the view (which we’ll create in a minute) and an array with the data to be supplied to the view.
Last, we need to create the show view.
The View and Completing the Page
Laravel view files are all stored in the resources/views folder. And they can be organized into subfolders within that directory.
In the previous step, we passed the view function the view name cars.show. That tells Laravel to look for a view file located in a subfolder named cars (within the main resources/views directory) named show.blade.php.
Laravel view files utilize the Blade templating engine, and hence are named .blade.php.
So, to finish the implementation of this Show Car page, we can create the resources/views/cars/show.blade.php view file with the following code:
<!DOCTYPE html>
<html>
  <head>
    <title>Car {{ $car->id }}</title>
  </head>
  <body>
    <h1>Car {{ $car->id }}</h1>
    <ul>
      <li>Make: {{ $car->make }}</li>
      <li>Model: {{ $car->model }}</li>
      <li>Produced on: {{ $car->produced_on }}</li>
    </ul>
  </body>
</html>
Since we passed the Car object to the view — back in the show action of the controller — with the array key car, we can access it in the view via a variable of the same name, $car.
Objects retrieved via a model are instances of that model class.
And, as you can see, the Car object’s values can be accessed using the same names as its associated cars database table’s column names.
Finally, you see the use of the Blade syntax for printing out information. The following, for example, prints out the car’s make:
{{ $car->make }}
That statement is simply translated into a pure PHP echo statement in the background:
<?php echo $car->make; ?>
But the Blade syntax makes writing views much faster and more enjoyable, and reading them much easier.
The Start of a MVC Web Application in Just 10 Minutes
And there you have it!
That is how quickly, and easily, you can build a MVC web application using Laravel 5.
With the combination of the Artisan CLI commands and the built-in functionality provided, building Laravel applications is both fast and fun.
