This is the final lesson of the Mini Web App course, which walks you through the creation of a simple web application, covering HTML and CSS, PHP, Bootstrap, Local Storage, and more.
In the final lesson of the Mini Web App course, we’ll take a look at interacting with your browser’s history to store dynamically-generated page states and creating cookies to store personalized information.
This lesson explains the basis behind creating webpages and web applications with dynamically updated URLs that don’t require new page loads, such as Pitchfork.com. (Notice how when you browse through their content, the URL changes, but your browser doesn’t ever have to load a completely new page. Pretty cool, huh?)
Part 1: An introduction to page states, interacting with your browser’s history, and cookies
What is a “page state”?
Just as with a “state of affairs,” or the “State of the Union address,” in Web development, a “state” refers to something’s current conditions. Frequently, this applies to the appearance of a webpage and what elements or functionality are currently active and/or visible to the user — this is known as a page state.
When you load a URL, it (should) always load the same exact content, or state. But sometimes, when you take a certain action, you effectively alter the state of the page.
Say, for example, when you visit a certain URL in your browser, it displays a list of cars, ordered by release date, with the newest appearing first. And say, on that same page, there’s a sort mechanism, such as a dropdown with various sorting options. If you use that sort mechanism to sort the cars alphabetically by name, you’ve changed the state of the page.
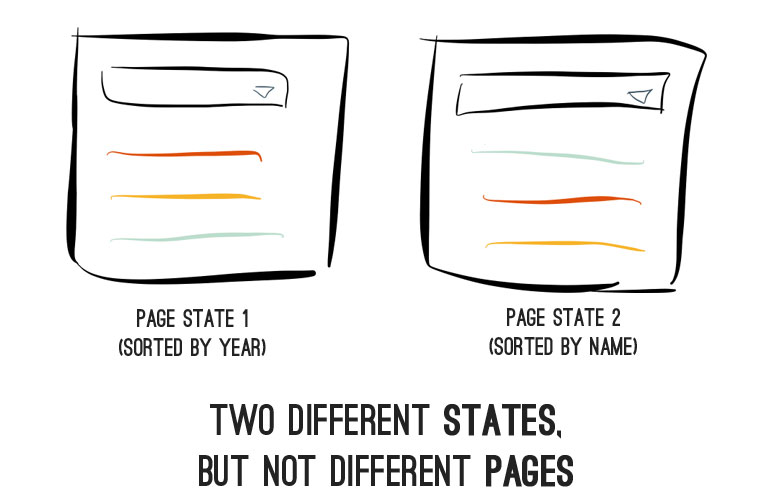
But you only used an interactive page element to change the state — you didn’t load a new URL — so the URL remains unchanged, and there’s no way to save that new state where the list of cars is sorted in a different order.
Sometimes when you take certain actions, you want to be able to save those new, resulting states, even though you didn’t load a brand new page in order to achieve them.
Is that possible? You betcha. So, how do we go about doing that?
Your browser’s history
Before we dive into that, let’s briefly discuss how your browser creates and stores a history. As you browse from page to page, your browser is always keeping track of that trail, noting when you visit each page, and in what order you do so.
That’s easily shown by viewing your browser’s history, which contains a list of all of the websites you’ve visited, timestamped according to the time you visited them.
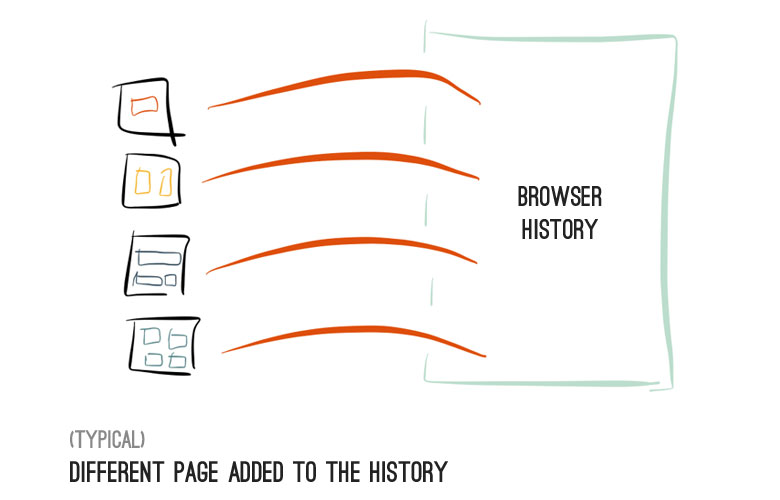
The fact that is stores your visited pages in order is also significant, as that gives you the ability to move backwards and forwards using the browser’s built-in buttons.
The key to all of this is that there’s a way, using JavaScript, to tap into your browser’s history and add entries, using code.
Using URL hashes to save page states (the old way)
Until fairly recently, saving page states that are generated after a page has been loaded (like in our sorting example, above), was achieved by altering the URL hash — appending a # followed by some additional text to the URL, such as http://example.com/#some_value.
The process to save a page state utilizing a URL hash value goes something like this:
- Alter the hash value, setting it to something that designates the new page state, say,
#sort=name_asc, for alphabetical sorting; and - add the new URL — with the hash value included — to the browser’s history.
The first part is quite trivial. You can alter a URL’s hash using the following JavaScript snippet:
// Alter the URL to be http://example.com/#new_hash
window.location.hash = 'new_hash';
The trickier part comes when you want to add that new URL to the browser’s history, as, by default, the history only adds new entries when a new page is loaded. In our sorting example, we just changed, the value of a dropdown element; we didn’t load an entirely new page, so, by default, a new history entry was not added.
But, as mentioned, we can use JavaScript to add entries to a browser’s history. For all modern browsers, the way to do this is by leveraging the HTML5 hashchange event. Just like a click event is triggered when a button is clicked, the hashchange event is triggered when the current URL’s hash is changed.
And that’s our silver bullet: if we can detect when the hash changes — and thus execute something when that occurs — and we have the ability to add entries to the browser’s history, we can effectively store new states without actually loading entirely new pages.
Using the HTML5 History API to alter full URLs to save page states (the new way)
Note: All code examples regarding the History API utilize the History.js plugin. Just as jQuery helps alleviate cross-browser issues for common JavaScript element-related functionality, History.js does the same for interacting with the history, ensuring that all History API functionality works across all browsers, by providing its own functions layered on top of the History API’s default ones.
The reason that hashes were previously exclusively used to trigger the addition of new page states into the history is because that used to be the only way to do it.
You weren’t previously able to change the actual URL. But now you can.
Using the HTML5 History API, you can add and alter full URL history entries without the need to load an entirely new page.
Adding new history entries with History.pushState()
Now, using the the History API (and the History.js plugin, as mentioned above), executing the following JavaScript:
var stateDataObj = { state_related: "info" };
History.pushState(stateDataObj, "Page Title", "/page/url/here");
would change the browser address bar’s URL to /page/url/here, creating a new history entry, and associating the given stateDataObj JavaScript object with that entry.
But, just as with changing the URL hash, it will not actually load that new /page/url/here page, or even check to see if a page with that URL exists; it’s only adding a new history entry.
“So,” you might be thinking, “what if we enter a URL to visit a page; perform some action, which calls History.pushState() to save the state’s URL; and then visit an entirely new page, such as http://www.google.com. What will happen if we then hit the back button? It’s just going to load the content from our original page, not the one with the altered state, correct?”
And you’d be exactly right! As it stands currently, it would load our new URL, but our original page content — not the altered state, which is the desired functionality. For that to happen, we need to add some additional code.
Using the History.js statechange event to render previously-saved states
Luckily for us, whenever a URL is accessed that was created via History.pushState(), the statechange event is triggered, and a bunch of information about the newly-activated state — including our stateDataObj that we originally passed in — is made available to us.
From there, it’s our responsibility to recreate the page state, as we wish for it to appear, using the value(s) contained in that stateDataObj.
An example of altering and recreating states created with the History API (using the History.js plugin)
Let’s take a look at a full, start-to-finish example to get a better idea of how the entire process works.
Let’s say we have the following page code:
<h1>Our Page Heading!</h1>
<p>Some other stuff...</p>
<button>Change Heading</button>
And let’s say that, for some odd reason, when our button is clicked, that we want to change the text of our h1 heading element to “NEW Page Heading”. Easy enough:
$('button').click(function(e) {
  var newHeading = "NEW Page Heading";
  $('h1').text(newHeading);
});
We also want this new state, with the alternative header text, to be saved via a new URL, /heading_alt. We can add a new history entry for our state using the following JavaScript:
$('button').click(function(e) {
  var newHeading = "NEW Page Heading";
  $('h1').text(newHeading);

  <strong>// Add the altered state to the history with the URL /heading_alt
  var stateDataObj = { heading_text: newHeading };
  History.pushState(statObj, "Alternate Heading Page", "/heading_alt");
  </strong>
});
Great! So now, when our button is clicked, our browser’s URL will change to read /heading_alt, and our new history entry will be added.
But we still need to implement the final piece of the puzzle: the functionality to recreate the page state when our /heading_alt URL is revisited, as that currently only occurs when our button is clicked.
This is where we take advantage of the statechange event mentioned earlier. In our case, when the statechange event is triggered (i.e. one of our previously-added states is revisited), we need to: 1) get our stateDataObj; and 2) update our page heading with the text that we stored in that stateDataObj object.
Here’s how we go about doing just that:
// Revert to our previously saved state
History.Adapter.bind(window,"statechange",function(){
  var State = History.getState();
  var stateDataObj = State.data;
  $('h1').text(stateDataObj.heading_text);
});
Now, when our /heading_alt URL is revisited, our new statechange event listener function, above, will be executed, and our page state with the altered heading will be displayed. Perfect!
SEO-related issues with dynamic page states
This is just some extra information for those SEO-minded folks. If that’s not of interest to you, feel free to just skip this section.
There are most definitely SEO implications of altering the history using the methods explained above. Search engines can only retrieve that state of a page as it appears when it’s initially loaded. What that means is that, even if we dynamically change a page’s content after it’s been loaded and alter the page’s URL, adding a new history entry, search engines won’t be able to associate that altered state with the new URL.
If you think about it, the reasons behind this are relatively straightforward. When we originally alter the page state, it’s achieved by clicking a button. A search engine doesn’t have that ability, nor would it even know which button(s) to click!
With that said, there are ways around these limitations, but they’re not trivial to implement (and they’re also usually quite time consuming). But, again, it can be done, namely by creating special hidden pages that can be accessed via a traditional URL (and thus can be accessed by a search engine) that contain the full code for all of your altered page states.
If you’re curious, you can read more on how Google handles SEO related to dynamically generated content.
Single-page web applications: embracing the power of dynamically saving page states
As mentioned before, this gives you the power to create very complete webpages and web applications that are all contained within one single page and that never require actual page loads.
When done right, this can create a terrific user experience, one akin to use an actual piece of installed software.
![]() You can take a look at this in action by visiting Pitchfork.com. You’ll notice how when you browse through their content, the URL changes, but your browser doesn’t ever have to load a completely new page. This is achieved using the same exact methods we’ve been speaking about thus far, populating the browser’s history when the page state is changed and making the necessary updates to the page’s content.
You can take a look at this in action by visiting Pitchfork.com. You’ll notice how when you browse through their content, the URL changes, but your browser doesn’t ever have to load a completely new page. This is achieved using the same exact methods we’ve been speaking about thus far, populating the browser’s history when the page state is changed and making the necessary updates to the page’s content.
Pretty damn cool.
Increasing popularity of dynamic state changes
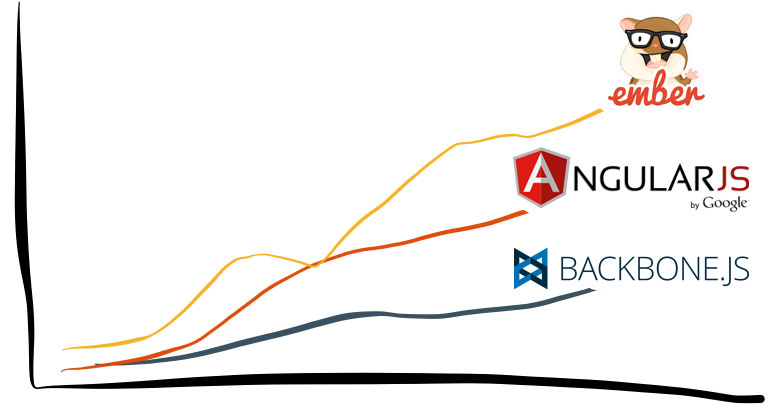
These days, dynamically loading content to change page states, and altering URLs accordingly, has been increasing tremendously in popularity, with the introduction of powerful front-end JavaScript frameworks like Ember, AngularJS, and Backbone that allow you to produce single-page web applications, which rely entirely on this technique, without ever requiring a new page loads.
It used to be that methods like these just weren’t feasible, both from technological and performance standpoints, but that’s just no longer the case. It will be interesting to see how everything plays out in this landscape, but needless to stay, the overall philosophy is certainly here to stay, for now.
“‘C’ is for cookie, that’s good enough for me!”
Our famous friend, Cookie Monster, spoken like a true Web developer.

While he may love to eat ’em, in Web development we use them for a different reason — to store small pieces of information associated with a webpage.
There are various theories as to how cookies got their name, as well as various uses for them, such as: including storing small pieces of personalized information such as your name, or your zipcode, for the display of weather information; tracking webpage visitors; and saving basic user preferences, such as the “Remember Me” functionality found on many login forms.
Cookies are comprised of a few pieces of information: a name, or key; an associated value; and an expiration date/time. The value is the piece of the information you wish to store, and the name of the cookie is what allows you to store and retrieve existing cookies in the future.
As mentioned, you can also set a cookie’s expiration date/time; they’ll continueto be stored within a user’s browser until the given expiration date/time specified (unless they’re deliberately cleared by the user).
There are different cases where different expiration dates make more sense than others. In the case of the one example mentioned above — supplying your zipcode for personalized weather information — that’s a piece of information that won’t likely change anytime soon, so you could tell the browser to keep that information for, say, a year.
But other settings — such as one to track how many times a user visits a page in a day — don’t make sense to store for that long. It would obviously only make sense to store that cookie for a single day.
Creating and referencing cookies
Cookies serve a simple, yet very useful, function in terms of Web development, and because of their common usage, they’re also very easy to interact with in nearly all programming languages.
Cookies in JavaScript
Using the common jQuery Cookie plugin, you can create a cookie using the following:
$.cookie('the_cookie', 'the_value');
If you wanted, you could set it to expire in 7 days using the following:
$.cookie('the_cookie', 'the_value', { expires: 7 });
You could then retrieve that cookie’s value like so:
$.cookie('the_cookie');
And delete it when you’re finished:
$.removeCookie('the_cookie');
Simple.
Cookies in PHP
As you may have noticed, cookies are, more or less, just key/value pairs stored within your browser, making them very similar in functionality to the arrays we discussed previously, in Lesson 3.
And, in PHP, the value of a cookie is retrieved in exactly the same manner as a value in an array:
$_COOKIE['the_cookie']
Setting cookie values in PHP is performed in a very similar fashion to how it’s achieved in JavaScript via the jQuery Cookie plugin, above:
setcookie('the_cookie', 'the_value', time() + (86400 * 7)); // 86400 = 1 day
Also quite straightforward.
Now that you know how to alter and save page states using the HTML5 History API, as well as store customized user information and preferences with cookies, let’s jump into this lesson’s interactive exercise and put some of that new knowledge to good use.
Part 2: Exercise: saving page states and adding cookies
In this exercise we’ll be using the HTML5 History API to save page states and cookies to add personalized information to our New Year’s Resolution list.
The steps in this lesson’s exercise require using bits of knowledge acquired from all of the previous Mini Web App lessons, from HTML & CSS, to JavaScript & jQuery, PHP, and Bootstrap.
A few notes
Only the HTML/PHP for the page nav and heading is shown in the editor as those are the only pieces of that code you’ll need to make changes to. You can use the Webpage Preview’s custom “back” and “forward” buttons to navigate between your page states for testing.
Additionally, the History.js plugin and the jQuery cookie plugin are both already included, making it easy for you to interact with both the history and cookies via JavaScript.
Resources for assistance
- Step 1
- Step 2
Step 1: Save your name in a cookie and display it to add personalization
First thing's first -- we need to add the form. Let's go ahead and add a small form to the right side of our header, containing just a text input and a button (with the
type="button" attribute). (Remember to give both the input and button id values so you can easily reference them in your JavaScript code!)Next thing we need to do is implement the ability to save the name entered in the form into a cookie. We're going to leverage the jQuery cookie plugin for this, which, as mentioned above, has already been included on the page. Add code that, when the button is clicked, retrieves the value of the input, and if it's not empty, uses the jQuery cookie plugin's functionality to add a cookie,
nyoc_name, with that value.And the last thing we want to do is actually display the name if it's set. Using PHP, add the custom name stored in the cookie to the beginning of the "New Year's Resolutions" page header. So, for example, if I set my name to "Alex", my header should then read "Alex's New Year's Resolutions".
Note: Unless you add a bit of extra JavaScript code, your customized name won't automatically appear in the heading; you'll have trigger a refresh of the Webpage Preview in order for your PHP code to pick up the newly-set cookie.
navbar-collapse element:
<form class="navbar-form navbar-right">
  <div class="form-group">
    <input id="my_input" type="text" class="form-control" placeholder="Enter your value">
  </div>
  <button id="my_button" type="button" class="btn btn-default">Save</button>
</form>
navbar-right class positions to form on the righthand side.
$.cookie("the_cookie", "the_value");
<?php
  echo $_COOKIE["nyoc_name"];
?>
Step 2: Change URL when our "add resolution" modal is shown/hidden
Note: It's not shown in the HTML editor, but you'll need to reference the "add resolution" modal in your JavaScript; theThe next thing we want to implement is the changing of the URL when our "add resolution" modal is displayed. As that's a significant change in page state (you go from viewing resolutions to adding one), it warrants its own URL.idof the modal isadd_resolution_modal.
Currently, the ability to trigger the display of our modal is handled by a few HTML attributes values and some working behind-the-scenes by Bootstrap.
Luckily for us, Bootstrap gives us the ability to easily add event functions that are executed at different stages of the modal display sequence, such as: when the modal is trigged to be shown, after it's fully displayed, when it's triggered to be hidden, and after it's fully hidden.
To start, we're going to utilize that first event: the one triggered when the modal is triggered to be shown. Add a function for that event, and within it, use the History.js plugin to change the URL to
/add and pass in the following state object: { action: "add_open" }. We'll discuss the reasoning and use of that state object in the next step.On the flipside, we then need to revert the URL back when the modal is closed. Establish a function for the third event mentioned above: one for one the modal is triggered to be hidden. Within that function, change the URL back to
/ and pass in the following state object: { action: "add_close" }.After you've implemented the changes above, test everything by checking to make sure that the Webpage Preview's URL changes when you use the back/forward buttons. Note though that the modal does not automatically open/close when navigating back/forward. We'll be addressing that in the next step.
// Triggered when modal is designated to be shown
$("#my_modal").on("show.bs.modal", function(e) {

});

// Triggered when modal is designated to be hidden
$("#my_modal").on("hide.bs.modal", function(e) {

});
var stateDataObj = { data_key: "data_val" };
History.pushState(stateDataObj, "State Title", "/state-url");
// Triggered when modal is designated to be hidden
$("#add_resolution_modal").on("show.bs.modal", function(e) {
  var stateDataObj = { action: "add_open" };
  History.pushState(stateDataObj, "Add Resolution", "/add");
});

// Triggered when modal is designated to be hidden
$("#add_resolution_modal").on("hide.bs.modal", function(e) {
  var stateDataObj = { action: "add_close" };
  History.pushState(stateDataObj, "Resolutions", "/");
});
Step 3: Toggle modal display based on URL change
In order to do this, we first need to establish a History.js state change event listener function.
Within that function, get the state -- the object containing all of the information about the state -- and then get the state's data object -- the one with the
action value that we passed in to our History.pushState() calls in the previous step.With the data object in hand, detect whether its
action value is equal to add_open or add_close, and show/hide the modal accordingly.
History.Adapter.bind(window,"statechange",function(){

});
statechange function using the following:
History.Adapter.bind(window,"statechange",function(){
  var State = History.getState();
  var stateDataObj = State.data;
});
History.Adapter.bind(window,"statechange",function(){
  var State = History.getState();
  var stateDataObj = State.data;
  if (stateDataObj.action == "add_open") {
    $("#add_resolution_modal").modal("show");
  }
  else {// if (stateDataObj.action == "add_close") {
    $("#add_resolution_modal").modal("hide");
  }
});
Part 3: Putting all of your new skills into action
Congrats on completing the Mini Web App!
If you’ve been following along, you’ve come a long way since lesson 1, so congratulations on a job well done!
I hope that you feel as though you have a stronger grasp on Web development in general, as well as a bunch of new knowledge and skills to match.
As a tribute to this being the last Mini Web App lesson, I want offer up a slightly different method of putting your skills from all of the lessons into action.
This time around, I would like to encourage you to come up with some of your own ideas on how to put your new skills into action. You now have the ability to execute on things, but with your increased knowledge, I bet you have an idea or two, as well, on how to keep moving forward.
And thanks for following along! I hope you’ve had just as much fun working through the lessons as I’ve had putting them all together!
Learning more about Web development
While we touched on many things throughout the Mini Web App, there are still plenty more things you can learn about in the exciting world of Web development.
If you’re interested in continuing to progress, my online course, Your First Web App, would be a perfect next step.
In the course, you build your own, fully featured web application using Laravel, a popular PHP web application framework. This course goes way more in-depth and builds on many of the topics from the Mini Web App course.