This is lesson 3 of the Mini Web App course, which walks you through the creation of a simple web application, covering HTML and CSS, PHP, Bootstrap, Local Storage, and more.
In the first two weeks of the Mini Web App course, we looked at HTML and CSS, and JavaScript and jQuery, all of which are involved with coding of the client-side, or the display of a webpage within a browser. This week we’ll take a peak into the world of server-side code.
Part 1: An introduction to PHP and server-side code
When talking about web development, there are typically two different kinds of code you’ll be dealing with: client-side code and server-side code.
As we’ve discussed, client-side code is that which deals with rendering the appearance and user interactivity of a webpage within a browser.
Server-side code, on the other hand, is code that is processed by a web server, and is run before any client-side code. The code can be written in any number of server-side scripting languages, and those pieces of code are frequently referred to as scripts. Scripts are code written to automate the execution of certain tasks, which are interpreted, or understood, by a certain environment, or a system that understands a certain programming language.
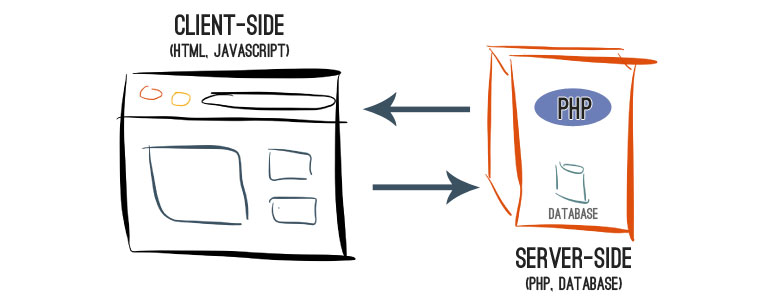
In our case, we’ll be working with the popular PHP server-side scripting language, which I find to be a great fit as a first language to learn. It doesn’t require a bunch of complicated prerequisite knowledge; it’s easy to use and understand; it provides plenty of powerful functionality out of the box; and it allows you to quickly create something concrete, demonstrating your progress almost immediately.
For those reasons, it’s a perfect fit for getting started with server-side coding.
Benefits of server-side coding
As mentioned, server-side code is one of the two crucial parts of the great majority of webpages and web applications. Let’s take a look at some of its benefits and reasons its use can be so important and beneficial.
Ease and streamline the creation of content
One of the huge benefits of PHP code is that it can be embedded directly within HTML code. That’s right — assuming you have an environment setup with the ability to interpret PHP code (and I’ll help you do just that on your own computer at the end of the lesson in the “putting your skills into action” section), you can simply rename a file such as index.html to index.php, and you’re then free to embed PHP code directly within your HTML. Pretty neat, huh?
We’ll learn more about how to do exactly that in the interactive exercise in Part 2, below.
Producing truly dynamic pages
As you’ve already seen, we can get away with using only client-side code to render a webpage, as was the case in both the exercises of lesson one and of lesson two.
But what if we wanted to, for example, actually save our New Year’s resolutions and be able to retrieve them, at will? That’s exactly where using server-side scripting to communicate with a database would come into play. We’ll go into detail on those topics in the next lesson, but you can imagine how being able to store and retrieve dynamic information opens up a whole new world of opportunities.
And a boatload of additional built-in functionality
From the ability to read uploaded files, to the ability to create and read cookies and interact with a database full of information, there are plenty of reasons to utilize server-side scripting. As you continue learning more and more about coding and web development, the endless possibilities will become increasingly obvious to you, but suffice it to say, server-side coding is at the core of almost every cool web application you’ve ever seen or interacted with.
Popular examples of PHP in action
Yup — a great deal of Facebook’s code is written in PHP. I assume that, for some of the same reasons mentioned above, when Mark Zuckerberg started hacking away at Facebook, he also deemed a PHP to be a good choice for the creation of his new web application.
Your News Feed page is actually powered by a PHP file, index.php, to be specific, which contains all of the behind-the-scenes server-side code responsible for rendering all of your and your friends posts, likes, comments, and more.

WordPress
At this point, you’ve almost certainly heard of WordPress, the most popular blogging platform in the world, responsible for powering an astounding 18.9% of the Web, as of July 2013, with that number only increasing daily. And, in fact, this very site adds to that statistic, as it’s built with WordPress.
WordPress itself is written entirely in PHP. The PHP code in WordPress handles everything from displaying administration screens, to creating new content, to storing information about images and generating the URLs by which you can access specific posts and pages.
While it certainly utilizes both client-side and server-side code, it’s the server-side code that does the heavy-lifting of retrieving existing items from the database, updating them when changes are made, and ensuring all of the site’s pieces remain reliably working together.
An introduction to PHP
In Lesson 2 of the Mini Web App course, we discussed some basics of coding that largely apply to programming languages across the board.
With that said, some new PHP-specific concepts will certainly be introduced, but, more so, we’ll be building on your current knowledge, seeing how it applies to PHP and server-side code-related tasks.
Translating a JavaScript function to PHP
Let’s start by taking one of the simple functions we wrote in Lesson 2 to highlight some of the subtle differences between the JavaScript and PHP. Here’s the function written in JavaScript:
function fiveTimesThree() {
  var result = 5 * 3;
  return result;
}
and here it is written in PHP:
function fiveTimesThree() {
  $result = 5 * 3;
  return $result;
}
You’ll notice that there’s only one minor difference: the syntax (or code format) for creating and referencing variables. As you may remember, in JavaScript, variables are created using the var keyword, whereas in PHP, you can see that they’re created using the $ symbol.
You’ll also notice that, whereas in JavaScript you refer to a variable simply by using its name, in PHP, you need to include the preceding $.
But other than that, the two functions are exactly the same. They both use the same format for defining a function and for assigning a value to a variable, they both use the same math operators, and they both use the same return statement format.
Building on the example above, let’s translate one more of the previous functions from Lesson 2 that accepts parameters (remember those special variables that can be passed into a function?).
In JavaScript, the function’s code is as follows:
function timesThree(numberToMultiply) {
  var result = numberToMultiply * 3;
  return result;
}
and in PHP, the code would be:
function timesThree($numberToMultiply) {
  $result = $numberToMultiply * 3;
  return $result;
}
Just as in JavaScript, the parameters are just variables, so in PHP, they require the preceding $ symbols. Other than that, it’s exactly the same.
Embedding PHP in HTML
As I mentioned previously, one of the most useful things about PHP is the ability to embed it directly HTML. But it may not be extremely apparent as to why this can be so useful initially, so let’s take a look at an example.
Say we have some information about 10 different cars that we want to display on a page. In straight HTML, this may involve a lot of repetitive code:
<h2>Audi A8</h2>
<div class="year">(2010–)</div>
<h2>Audi A7</h2>
<div class="year">(2010–)</div>
<h2>Audi A6</h2>
<div class="year">(2011–)</div>
<h2>Audi Q3</h2>
<div class="year">(2011-)</div>
<h2>Audi S4</h2>
<div class="year">(1991–1994)</div>
<h2>Audi Avant RS 2</h2>
<div class="year">(1993–1994)</div>
<h2>Audi S8</h2>
<div class="year">(1994–2003)</div>
<h2>Audi S6</h2>
<div class="year">(1999–2004)</div>
<h2>Audi S4 quattro</h2>
<div class="year">(1997–2002)</div>
<h2>Audi S3</h2>
<div class="year">(1999–2003)</div>
“Well, sure,” you might say, “but I can simply create the code for the first car, copy and paste it a few times, and then change the details for each subsequent one.” …to which I might counter with “Yes, you could…and then what if you want to change those h2 tags to h3 tags. You’re gonna have fun doing that in twenty different places, eh?”
D’oh! Luckily for us, by utilizing PHP, we can make our job much, much easier.
Before we do that, there’s a new programming data structure — a way, in programming, to store and organize data — we need to discuss: the array.
Using arrays to store a collection of elements
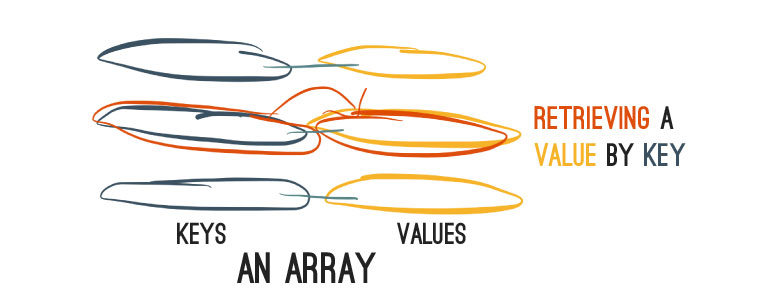
In programming, arrays are used to store multiple elements — values or variables — together. Arrays are present, in some form, in almost every programming language; they are not specific to PHP.
But as it’s our current topic of discussion, let’s take a look at how arrays are represented in PHP. At their simplest, an empty array (i.e. containing no elements) can be created and stored in a variable like so:
$emptyArray = array();
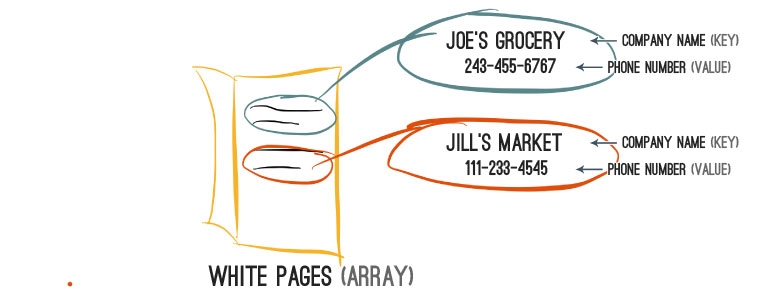
In PHP, arrays are just big key–value mappings, such as a telephone book (remember those?). Just as you can use the name of a business (the key) to look up their telephone number (the value) in the white pages, the same is true for items in an array.
A single item can be added to an array in PHP using the following format:
$companyPhones = array();
$companyPhones["<strong>key</strong>"] = <strong>value</strong>;
Note that array keys must always be strings (or variables containing strings).
So if we wanted to, for example, create an array of companies’ phone numbers, we could do the following:
$companyPhones = array();
$companyPhones["Sir Pops A Lot"] = "240-244-9866";
where the key, in the example above, is “Sir Pops A Lot” — or the company’s name — and the value is “240-244-9866” — or the company’s phone number. (And in case you’re curious, I did indeed, for some odd reason, just assume that “Sir Pops A Lot” was the name of an actual popcorn company, and sure enough, a quick Google proved me right. You can check out the Sir Pops A Lot Facebook page for more details, to satisfy your, I’m sure burning, by now, desire to learn more.)
You can also create an array that contains elements right off the bat. We could use the following code to create our previous array containing the “Sir Pops A Lot” entry right away:
$companyPhones = array(
  "Sir Pops A Lot" => "240-244-9866"
);
Additional elements can be included simply by separating them with a comma, like so:
$companyPhones = array(
  "Sir Pops A Lot" => "240-244-9866",
  "Safeway" => "301-392-1875"
);
Note that when creating an array that contains elements, the format is always the same for each element:
array(
  "<strong>key</strong>" => "<strong>value</strong>"
)
You might be thinking, “That’s great, but then how do I get information back out of the array, so I can use it?” Great question. And, in programming, it works almost the same way as it does in the white pages — you use the key to retrieve its matching value.
So if we wanted to retrieve Sir Pops’ phone number, we could retrieve it from our array like so:
$sirPopsPhone = $companyPhones["Sir Pops A Lot"];
You might recognize that the piece of code used to retrieve a value from an array is the same piece of code that was used on the left of the = when setting a value in the array. Note that this is almost exactly the same as setting and retrieving values of simple variables, since, in essence, $companyPhones["Sir Pops A Lot"] is just a variable, itself.
Creating arrays without specified keys
Now, when dealing with arrays, you frequently don’t need to set specific keys. If we wanted to, say, create an array of names, we could do the following:
$arrayOfNames = array(
  "Batman",
  "Tom",
  "Pamela",
  "Beth",
  "Danger",
  "Duritz",
  "DreamCast",
  "Blume",
  "Leopold"
);
The above $arrayOfNames is an array containing nine different names to consider for your next-born child (there are some real winners in that list), but notice that keys are not specified — only values are.
In this case, PHP automatically assigns incremental integers, starting at 0, to each of the values in our array. So, the following code is identical, in terms of functionality, to the previous example:
$arrayOfNames = array(
  0 => "Batman",
  1 => "Tom",
  2 => "Pamela",
  3 => "Beth",
  4 => "Danger",
  5 => "Duritz",
  6 => "DreamCast",
  7 => "Blume",
  8 => "Leopold"
);
But PHP is nice enough to realize that, if we don’t explicitly provide keys, it can just assign incremental integer values, to save us the trouble of having to specify them manually. And just as we retrieved values in our array above, that did contain keys, we can retrieve them from our array with auto-assigned integer keys as so:
// $fifthName will contain "Danger"
$fifthName = $arrayOfNames[4];
Remember that, as is shown above, since the auto-assigned integer keys begin at 0, not at 1, in order to retrieve the fifth element in the array, you must use the 4 key.
Adding items to the end of an array
One last thing that PHP provides us with a shortcut for is adding elements to the end of an array. We can, for example, add an additional name to our array using the [] empty bracket syntax:
$arrayOfNames[] = "Alistair";
Our new value would then be associated with the auto-assigned integer key of 9, as expected.
Storing multiple types of elements in an array
Note that, in PHP, arrays can contain any assortment of different values, including variables. So, for example, the following array is completely legal:
$myName = "Alex";
$infoArray = array($myName, "Boston", 2);
Note that it contains: a variable, $myName; a string, “Boston”; and a number, 26.
And, wait for it…arrays can even contain other arrays! So the following is also a legal array definition, in PHP:
$myName = "Alex";
$myDreamCar = array(
  "make" => "Audi",
  "model" => "S8"
);
$infoArray = array(
  "name" => $myName,
  "hometown" => "Boston",
  "number_of_cats" => 2,
  "car" => $myDreamCar
);
Arrays containing other arrays are known as multidimensional arrays.
Looping through elements of an array
In most languages, and PHP is no exception, you’re afforded an easy way to loop, or progress, through a collection of items, such as those in an array.
In PHP, this can be done using a foreach loop, in the following format:
foreach ($array as $key => $value) {
  // here we have access to the *current*
  // element's key and value
}
If you have an array that does not utilize assigned keys (as we discussed earlier with auto-assigned integer key values), you can loop through its elements using the following, simplified format:
foreach ($array as $value) {
  // here we have access to the *current*
  // element's and value
}
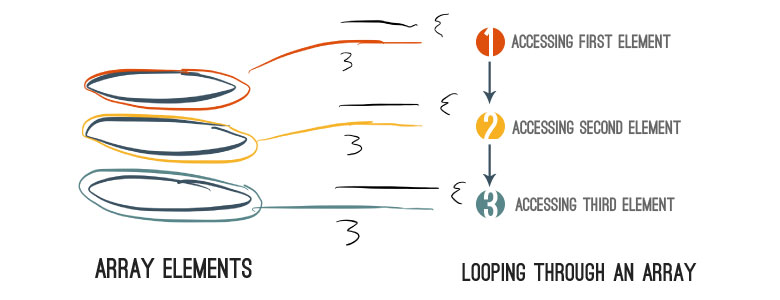
So, for example, if we wanted to loop through the names in the array from our previous example and print them all out, using PHP’s echo function, we could do so using the following:
$arrayOfNames = array(
  "Batman",
  "Tom",
  "Pamela",
  "Beth",
  "Danger",
  "Duritz",
  "DreamCast",
  "Blume",
  "Leopold"
);

foreach ($arrayOfNames as $currentName) {
  echo $currentName;
}
[ FIGURE: ADAPTED TO SHOW MOVING FROM NAME, TO NAME (designating the current elements index value) ]
Note that the $value variable (and the $key variable, for that matter) in the opening foreach block can be named whatever you’d like — I used $currentName for the value’s variable name, in the example above.
Remember when I said you can embed PHP code directly within HTML, with that being one of its biggest benefits? Yeah, let’s get back to that, now…
Embedding PHP in HTML (part deux)
Now that you have new knowledge about arrays and loops in PHP under your belt, we can return to discussing the usefulness of embedding PHP within HTML.
Embedding PHP code within HTML code is quite easy — you simply wrap the PHP code within starting, <?php, and ending, ?>, tags and you’re good to go (again, assuming your environment has the proper software installed to allow it to interpret the PHP code).
Let’s give it a go. Say we have a webpage and we want to print out a list of all of these awesome names that have been floating around. We could do so using the foreach loop we discussed previously:
<h2>A list of awesome names</h2>

<?php
$arrayOfNames = array(
  "Batman",
  "Tom",
  "Pamela",
  "Beth",
  "Danger",
  "Duritz",
  "DreamCast",
  "Blume",
  "Leopold"
);

foreach ($arrayOfNames as $currentName) {
  echo $currentName;
}
?>
Note that, as mentioned, we simply have to wrap our PHP code in the PHP opening and closing tags, <?php and ?>. But there’s one problem: the above code is going to render something that looks like this:

Blah — that’s no good! Luckily, it’s quite easy to fix. We are, remember, essentially just using PHP to render HTML elements, so if we modify our code as follows, to utilize HTML p, paragraph, elements for each of the names, they’ll be nicely displayed on their own lines. The altered foreach code:
foreach ($arrayOfNames as $currentName) {
  echo "<p>" . $currentName . "</p>";
}
and the resulting HTML:

Note, in the altered PHP code, that whereas in JavaScript we used the plus, +, operator to join multiple strings, in PHP we use the dot, ., operator.
Moving on to the exercise
You now have a bunch more knowledge in your tool kit. You know the basics of a very important data structure used in all walks of programming — the array. You know how to create them, manipulate them, and loop through their elements.
You also now know the subtle differences between syntax in JavaScript vs. PHP, but, maybe more importantly, you can start to realize how many similarities different programming languages share.
And finally, you have an understanding of one of PHP’s biggest benefits: its ability to be embedded directly within HTML.
Let’s move on to the exercise to reinforce your new knowledge.
Part 2: Interactive exercise
Time to start putting your new skills into action!
As you may have guessed, in this week’s interactive activity, we’re going to put PHP into action and use it to help us simply the previous implementation of our New Year’s Resolutions list.
As in the previous lessons, the steps for the activity are shown in the left-hand column, below. You’ll notice that each step contains tips, but try completing them on your own, first! The best way to learn how to code is by doing. If you get stuck (which is totally fine, and will inevitably happen at points), then seek some help. Trust me on this one.
In this week’s exercise, as has also been the case in past lessons, we’ll be building on the progress you’ve made when coding for the interactive exercises of the previous weeks. I’ve pre-populated the initial HTML code you’ll need. Note that for this week’s exercise, we’re only dealing with the resolution list’s HTML. The other elements are still present, but you don’t need to (and shouldn’t) add code for them to the editor.
The interactive code editor for the activity is shown in the middle column. You’ll be entering your PHP and HTML and code in the same editor.
The editor for this lesson’s exercise functions slightly differently from the editors in previous lessons. Instead of automatically updating, after you’ve made changes, click the “Check my code” button. If your code is correct for the given Step you’re working on, a “Success” message will be displayed at the top of the “Webpage Preview”. If the code is not correct, a “Waiting” message will appear, designating that their may be mistakes in the code or that changes still need to be made in order for it to be correct for a given Step.
If you have any troubles, don’t forget, I’m just an email away.
Resources to use for guidance
As mentioned previously, the foremost goal of each Mini Web App lesson is always to help you learn new skills, by providing you with the tools you need to work through the exercises without getting overly frustrated or overwhelmed.
Below is the list of resources to help you out with this week’s lesson. And remember, you don’t necessarily need to (and probably shouldn’t) visit all of these resources right now; go ahead and jump into the exercise, and if you get stuck, then come back and reference the resources.
Step 1
Step 2
- PHP foreach
PHP string operators (e.g. joining strings)
PHP escape sequences
Step 3
Step 4
- PHP arrays (see Step 1)
Step 1: Establish an array to hold our resolutions
$resolutions that contains one string element for each of your New Year's Resolution items.Note: Place your PHP code above the existing HTML, within the editor.
$myArray = array("item one", "item two", "item three");<?php and ?>. <?php
$resolutions = array(
"My first resolution",
"My second resolution",
"My third resolution"
);
?>Step 2: Alter our list's HTML to be generated using our new PHP array
First, remove the current HTML code responsible for producing the
li resolution list items.Next, establish a
foreach loop that will allow us to loop through the resolution elements contained in our array, placing the code where the li items used to live, within our HTML. (And remember: every piece/block of PHP code must be wrapped in the opening and closing PHP tags!)Finally, within the
foreach loop, print out the necessary HTML for each item. In case you forgot (because I realize I just told you to remove the previous items' HTML code), the format for each item is as follows:<li><div>Resolution name</div><input type="text" /></li><?php
foreach ($myArray as $arrayElement) {
// do stuff in here, remembering that
// $arrayElement contains the value of
// the *current* element
}
?>. operator, for example:<?php
// $joinedString will contain the HTML <p>My name is Alex</p>
$myName = "Alex";
$joinedString = "<p>My name is " . $myName . "</p>";
?>' or double quotes, " -- they both work just fine. But a potential problem arises when your string itself contains either single or double quotes. In that case, you have to either wrap your string in the type of quotes your string doesn't contain (i.e. if your string contains traditional quotes, wrap it in single quotes, '):$myString = '<input type="text" />';$myString = "<input type=\"text\" />";
<ul id="resolution_list">
  <?php
  foreach ($resolutions as $resItem) {
    echo '<li><div>' . $resItem . '</div><input type="text" /></li>';
  }
  ?>
</ul>
Step 3: Move our PHP list items' HTML generation code into a function
function.With that in mind, we're going to move the PHP code responsible for generating our list items into its own function. At the top of your HTML code editor, create a PHP function named
renderResItem that accepts one parameter, $resItem. (Remember to make sure it's contained within PHP starting and ending tags.) Within that function, place the previous PHP code responsible for rendering, or printing, one of our list items.Next, remove the PHP code inside of the
foreach loop currently embedded within our HTML ul element, and replace it with a call to our new renderResItem, passing the current $resItem to the function.
<?php
function printMyName($myName) {
  echo "My name is " . $myName;
}
?><?php
printMyName('Slim Shady');
?><?php
function renderResItem($resItem) {
echo '<li><div>' . $resItem . '</div><input type="text" /></li>';
}
?>
<ul id="resolution_list">
  <?php
  foreach ($resolutions as $resItem) {
    renderResItem($resItem);
  }
  ?>
</ul>
Step 4: Add descriptions to our resolution items
The first thing we'll need to do is alter the format of our resolutions' array. Remember when I said previously that arrays themselves can contain other arrays (known as multidimensional arrays)? Well, we're now going to put that concept into practice.
Instead of just a string with the resolution's name, alter the existing
$resolutions array so that each resolution item, itself, is an array containing two pieces of information: the resolution's name, and its description.And in order to distinguish between those two pieces of information, let's utilize named keys for our resolution items' arrays; use the keys "name" and "description" when creating each item's array. For the actual description text, you can just use a simple string to briefly describe each of your resolutions.
With the changes made to the array, we can now alter our
renderResItem function to take those changes into account. And now that we have the code responsible for rendering our resolution items contained in one single place, it's very easy to make changes to it, such as displaying additional content -- our new descriptions, in this case.The first thing to remember is that the
$resItem we're passing to our renderResItem function is now an array, not just a string.With that in mind, within the function, first alter the current code being used to print the resolution's name so that it references the new
resItem array's name value.And finally, add the new
description to the end of the item's HTML, wrapped within <small> and </small> tags.
<?php
$people = array(
  array(
    "first_name" => "Alex",
    "last_name" => "Coleman"
  ),
  array(
    "first_name" => "Lex",
    "last_name" => "Luther"
  ),
);
?>$resolutions array should look something like this:<?php
$resolutions = array(
array(
"name" => "My first resolution",
"description" => "First res description"
),
array(
"name" => "My second resolution",
"description" => "Second res description"
),
array(
"name" => "My third resolution",
"description" => "Third res description"
)
);
?><?php
foreach ($people as $personItem) {
echo "This person's name is " . $personItem["first_name"] . " " . $personItem["last_name"];
}
?>renderResItem function's code should look like this:<?php
function renderResItem($resItem) {
echo '<li><div>' . $resItem['name'] . '</div><input type="text" /><small>' . $resItem['description'] . '</small></li>';
}
?>Part 3: Putting your new skills into action
As with every Mini Web App lesson, one of the goals is always for you come away with ways to put your new expertise and skills into practice right away. Here are a few ways you can begin using your new knowledge of PHP today:
Explore the PHP documentation
Just as I mentioned last week, a language’s documentation is generally a great place to learn more about its capabilities.
Check out the PHP function reference for a listing of all of the functions made available to you in PHP, organized by their type of functionality.
Configure your own computer so you can code in PHP
As I mentioned previously, in order for you to be able to write and execute PHP code on your own computer, it needs to be properly configured and have certain software installed.
If you’re interested in being able to write and test PHP code on your own computer, I’ve prepared a guide to help you, which is an excerpt from my upcoming book, “Your First Web App”, a step-by-step guide to developing your first web app.
Play around with the test code
Again, for this week’s activity, I’ve packaged up the final code files, which include the code as it would look after successfully completing the entire exercise in Part 2, above.
Note that, in order to work with the PHP code, you must first configure your computer so it can interpret and run PHP code. Follow the instructions above to do just that!
Once configured, simply unzip that file and open up the index.php file in your text editor (TextEdit on Mac and Notepad on Windows both work just fine). Try making some changes based on your new knowledge or information you acquired from perusing the PHP documentation.