This is lesson 2 of the Mini Web App course, which walks you through the creation of a simple web application, covering HTML and CSS, PHP, Bootstrap, Local Storage, and more.
HTML and CSS are essential pieces to every webpage, but it’s when we introduce their friend JavaScript that things start really getting interesting.
Part 1: Introduction to JavaScript and jQuery
Last week we created a simple interface with HTML and CSS. It would work fine on its own to display a list of New Year’s Resolutions (NYR), but with that said, it was a still a bit…bland.
And honestly, while KISS (“keep it simple, stupid”) is typically a great principle, our NYR list would actually be more usable if its functionality were a bit more complex.
Improving user experience with added interactivity
Again, keeping things simple is generally a great idea. The worst thing you can do is confuse your users. But with that said, adding additional functionality and interactivity to a webpage can often have strikingly positive impacts in terms of how effectively people use what you’ve created.
You can see some great examples of this throughout Apple’s iOS and some of the native iPhone apps. For example, when viewing an iBook, instead of simply tapping buttons that read “Previous” or “Next” to navigate between pages, you can simply swipe left and right, just as if you were turning a page in a real book.

Another simple, yet wonderful, example are all of the “toggle switches” found in the iOS Settings pages. While they could just as easily be checkboxes, it’s even more intuitive for them to displayed as, essentially, on/off switches. Yet another example of added complexity improving the user experience.
Standardization of dynamic functionality in user interface (UI)
A lot of the current dynamic functionality and UI elements you see frequently throughout the web became popular as the result of trends, but the reason they’ve stuck around and stayed popular is because they really work. They’re intuitive. They click with how a user expects an object to react to their actions.
Let’s briefly touch on a few of them to see why they’re so effective.
Drag-and-drop
When you’re reordering things in real life, how do you go about doing so? You just pick them up and rearrange them, of course! This makes so much sense that drag-and-drop has become the de facto standard for reordering items on a webpage or within a web app.
Inline editing
In real life, if you’re, say, writing down a recipe, do you have a different place where you look at the recipe versus where you make changes to it? No! You make changes to it directly within the content itself. It’d be silly (and wasteful), otherwise. That’s why the concept of inline editing — or making changes to content directly within the same context you’re viewing it — has also become quite popular, as it just makes sense.
Introduction to JavaScript
JavaScript is a programming language with plenty of useful built-in functionality, such as the ability to perform math operations, date and time calculations, and much more. But it’s claim to fame is its ability to interact directly with HTML objects on a webpage. More on that later.
At it simplest, a snippet, or a small piece of code, of JavaScript to calculate the result of 8 times 4 would look like this:
8 * 4with the * representing the multiplication operator (which is the case in almost all programming languages, by the way).
You can also store pieces of information in JavaScript in variables. Variables are essentially named placeholders that allow you to reuse information throughout your code, simply by referring to them by name. So, if we wanted to to store the result of our previous calculation (say, to use it again at a later point in time), we could do the following to store it in a variable named result:
var result = 8 * 4;This effectively says to our code: “Compute the result of 8 times 4 (the right side of the equals sign) and store it (as designated by the equals sign, itself) in a variable name result.”
Note that when defining a variable, its name must be proceeded with the
varkeyword. Additionally, all variable names must be just one word.
The result of our calculation, 32, is now stored in the variable result. We can then, as mentioned, use it again within another piece of code, such as:
// anotherResult will hold the value 42
var anotherResult = result + 10;
There are a few things to note in the code above. First, you can see the use of a comment in the first line of the code snippet above:
// anotherResult will hold the value 42Comments can be added as a way to describe a piece of code and are created by preceding a line with a double forward slash, //, as shown above. Note that comments are not considered as actual lines of code, and they won’t ever have any effect on the code, itself. They’re simply there to make it clear to someone else who may be reading your code (or to remind yourself) what it should be doing.
And finally, every operational line of code — every line directly responsible for some functionality, such as defining a variable or performing a calculation — must end with a semicolon, ;. The semicolon essentially says to the code, “Okay, this operation is now complete. Move on to the next, please!”
Packaging code functionality using functions
Frequently, when coding, you’ll write group of code lines all designed to work together to perform a specific task. In JavaScript (as well as in most other programming languages), we’re given a very convenient way to organize such pieces of code: by defining functions.
Functions allow us to package code together that’s designed to perform a specific task, such that it can be reused over and over again. So, for example, if we wanted to multiply 5 by 3 (not exactly something we’d want to do over and over, but just bear with me, for the sake of the example, and I promise we’ll discuss some more complex, more useful examples, shortly), we could create a function to do so:
function fiveTimesThree() {
  var result = 5 * 3;
}
Functions are always defined in the same exact manner you see above — they begin with the function keyword, followed by open and closed parentheses, followed then by open and closed curly braces, { and }. And, as you can see, all of the function’s code is placed within the curly braces. You can think of the curly braces as a function’s bookends, designating where it begins and where it ends.
After a function is defined, we can then call, or execute, it using the following:
fiveTimesThree();Note that, to execute a function, you simply use its name, followed by open and closed parentheses, finished with our trusty semicolon. (Remember, again, that every operational line of code must end with a semicolon!)
There’s only one problem…our result is trapped within our function. So, as it stands, we can’t access it, thus rendering our function pretty useless.
Fortunately, there’s an easy way to remedy that: by adding a return statement to the end of our function:
function fiveTimesThree() {
  var result = 5 * 3;
  return result;
}
What that simple, yet extraordinarily useful, return statement does is sends our result back to us whenever we execute our function. This way, when we call our function, we’ll be able to store the returned value — 15, in this case — in a new variable, like so:
var fiveTimesThreeResult = fiveTimesThree();“Well, that’s fine,” you may be thinking, “but simply multiplying 5 and 3 together is sort of…useless.” And you’re exactly right. It is.
Luckily for us, JavaScript functions can be written to accept arguments (as is also the case, again, in almost every other programming language). Arguments are specialized variables that we can pass into a function.
Let’s go ahead and modify our previous function to accept an argument, making it much more versatile:
function timesThree(numberToMultiply) {
  var result = numberToMultiply * 3;
  return result;
}
As we discussed previously with variables, function arguments — which, remember, are variables themselves — can also be used directly within a line of code, as seen above with numberToMultiply. And we now have the ability to pass any value for numberToMultiply we’d like to into our function, like so:
// timesThreeResult with be 36
var timesThreeResult = timesThree(12);
Note that argument values are supplied within the parentheses when calling our function. And functions can be written to accept as many arguments as you’d like. So, for example, we could create and call a function with two arguments like this:
function multiplyNumbers(numberOne, numberTwo) {
  var result = numberOne * numberTwo;
  return result;
}

// fiveTimesSixResult will be 30
var fiveTimesSixResult = multiplyNumbers(5, 6);
Note that in order to define a function that accepts multiple arguments, you simply separate them with commas. The same is true when calling a function that accepts multiple arguments and passing it values.
Wrapping up the JavaScript basics
You now have a solid understanding of the basics of JavaScript, and actually some of the basics of almost any programming language, for that matter!
But let’s get back to what we’re really here to talk about — JavaScript’s most valuable asset: its ability to interact directly with HTML elements on a webpage.
Using JavaScript to interact with HTML elements
This is where things really start to get interesting. And this is also where we can really get into the meat of this lesson: discussing how we can add interactivity to webpages by leveraging JavaScript’s abilities to reference and manipulate HTML elements.
Accessing specific page elements
In order to be able to manipulate a webpage’s elements, the first step is to be able to select, or access, them. And to understand how that’s made possible, we need to briefly discuss a few HTML-related concepts.
Using id and class attributes to access elements
When using JavaScript to get ahold of specific page elements, you essentially need to write code that searches a webpage’s HTML code, and, in some way, picks out the correct one(s). Say we’re trying to manipulate a specific paragraph, p, element, but our page has many p elements (which is very common). How do we pick out the specific one we want? The best way to do this is by assigning the p we want to target a unique id attribute value.
As you may remember from Lesson 1, you can assign an HTML element’s attribute values within their opening tags. Every HTML element is allowed to have a unique id attribute value by which it can be identified. And this is perfect for our current situation, where our goal is to access a specific HTML element within our page.
Doubling back to our previous scenario, say we have the following HTML code within our page:
<p>
Kogi viral pop-up gentrify fingerstache Cosby sweater Tumblr, quinoa literally artisan put a bird on it wayfarers trust fund paleo pork belly. Fap butcher fingerstache, DIY church-key lo-fi single-origin coffee tofu vinyl leggings sustainable mixtape shabby chic flannel.
</p>

<p>
Wes Anderson banh mi organic Echo Park distillery occupy. Flexitarian organic Helvetica twee meh. Carles sartorial lomo, master cleanse Truffaut dreamcatcher typewriter Neutra narwhal.
</p>
And let’s say we want to access only the first paragraph. We can assign the first paragraph an id value, which will make it possible for us to select that, and only that, p via JavaScript, as we’ll see in just a bit:
<p id="first_para">
Kogi viral pop-up gentrify fingerstache Cosby sweater Tumblr, quinoa literally artisan put a bird on it wayfarers trust fund paleo pork belly. Fap butcher fingerstache, DIY church-key lo-fi single-origin coffee tofu vinyl leggings sustainable mixtape shabby chic flannel.
</p>

<p>
Wes Anderson banh mi organic Echo Park distillery occupy. Flexitarian organic Helvetica twee meh. Carles sartorial lomo, master cleanse Truffaut dreamcatcher typewriter Neutra narwhal.
</p>
“But wait,” you might be thinking, “what if I wanted to select, say, all of the even-numbered paragraphs?” Glad you asked! The most useful way to access multiple elements at once is usually via class attributes.
As we also discussed in Lesson 1, class attributes are used heavily in CSS in order to alter the appearance of multiple, related, HTML elements. They differ from an id though, in that multiple HTML elements can have the same class, whereas id values must be unique.
Going back to the example you mentioned (or that I took the liberty of mentioning for you), of selecting even-numbered paragraphs, we could make that easy for ourselves by assigning all of the even-numbered paragraphs the same class value, like so:
<p>
Raw denim Truffaut Blue Bottle chia fap fingerstache. Tumblr pickled single-origin coffee brunch, vinyl tote bag polaroid Austin keffiyeh. Leggings you probably haven't heard of them tofu +1.
</p>
<p class="even">
Art party skateboard direct trade plaid, brunch lomo Pinterest. Semiotics pickled photo booth gastropub organic. Selvage sartorial vegan ethnic, mixtape umami food truck mlkshk.
</p>
<p>
Narwhal Blue Bottle deep v cornhole. Deep v pug PBR actually butcher disrupt. Distillery Austin tousled twee umami. Meggings Truffaut PBR&B, sriracha church-key Echo Park leggings tousled.
</p>
<p class="even">
Fap selfies farm-to-table, Intelligentsia selvage PBR&B Wes Anderson. Bicycle rights letterpress street art, photo booth Echo Park Pitchfork Portland mumblecore whatever occupy.
</p>
Utilizing the jQuery framework for ease and consistency
In programming, frameworks are generally a collection of useful code modules intended to make it easier to implement common functionality, preventing you from having to write all of the code on your own to perform such tasks.
And, as you may have guessed, that’s exactly why we’ll be using the jQuery framework. jQuery provides very easy ways to access, manipulate, and add functionality to HTML elements, while also providing the huge additional benefit of taking care of any common cross-browser issues, making sure that everything works properly when a webpage is accessed via all of the different web browsers in their various versions. (And believe me, that really is an enormous benefit. Before jQuery came around, it required a lot of extra work just to ensure code worked consistently within all browsers. jQuery takes care of that all for us, automatically, behind-the-scenes, which rocks.)
Selecting HTML elements the old fashioned way (without jQuery)
jQuery itself is written entirely in JavaScript, and it’s possible to perform all of the same exact functionality it provides via vanilla (or traditional) JavaScript code. But let’s take a look at just how much easier it is to do something simple, such as selecting a specific element by its id, in jQuery versus in traditional JavaScript.
In traditional JavaScript, selecting our first_para paragraph looks like this:
var firstPara = document.getElementById('first_para');whereas in jQuery, it looks like this:
var firstPara = $('#first_para');And let me tell you, after having spent the beginning of my career typing document.getElementById over and over and over again, jQuery’s method felt like a godsend.
Using jQuery selectors to access elements
Now, that jQuery code above may look a little strange, so let’s discuss what’s actually going on there. jQuery uses their concept of selectors in order to access different elements within a page. When accessing elements via jQuery, you always use the following syntax:
$('selector-goes-here')The $ is shorthand to tell the code “I want to use jQuery to select some elements”, and it’s followed by open and closed parentheses, which contain the jQuery selector string within them. The selector is used to designate the elements we wish to access, and can take many different forms.
When it begins with a #, that tells jQuery to select an element with the corresponding id value. So our code above translates to: “Use jQuery to select the HTML element with the id of first_para.”
We can also use jQuery to select elements via their class attribute by substituting the # with a dot, .. So to select our even paragraphs from our example above, we could use the following statement:
var evenParas = $('p.even');You may notice, though, that one thing is different with this selector compared to our previous one, where we were selecting an element by its id. When using a jQuery selector, you can always reference elements via their HTML tag (p, for paragraph, in this case) as well as any attributes (the even class name, as referenced by the .even in our selector).
When we’re selecting an element via its id, the HTML tag designation isn’t necessary, as id values must be truly unique: no two elements can have the same id. But in the case of class values, multiple elements can have the same class. The reason behind using the HTML tag in the selector in the example above becomes very clear if we modify our example HTML slightly to include additional h2 headers, one of which also has the even class:
<h2>First header</h2>
<p>
Raw denim Truffaut Blue Bottle chia fap fingerstache. Tumblr pickled single-origin coffee brunch, vinyl tote bag polaroid Austin keffiyeh. Leggings you probably haven't heard of them tofu +1.
</p>
<p class="even">
Art party skateboard direct trade plaid, brunch lomo Pinterest. Semiotics pickled photo booth gastropub organic. Selvage sartorial vegan ethnic, mixtape umami food truck mlkshk.
</p>
<h2 class="even">Second header</h2>
<p>
Narwhal Blue Bottle deep v cornhole. Deep v pug PBR actually butcher disrupt. Distillery Austin tousled twee umami. Meggings Truffaut PBR&B, sriracha church-key Echo Park leggings tousled.
</p>
<p class="even">
Fap selfies farm-to-table, Intelligentsia selvage PBR&B Wes Anderson. Bicycle rights letterpress street art, photo booth Echo Park Pitchfork Portland mumblecore whatever occupy.
</p>
With this new HTML, you can see the value (and necessity) of using the HTML element designation in the jQuery selector:
// allEvenElems would contain *all* of the elements with the "even" class, both h2 and p
var allEvenElems = $('.even');

// evenParas, on the other hand, will contain *only* the p elements with the "even" class,
// and *not* the h2 elements, which is our desired functionality
var evenParas = $('p.even');
There are many other types of selectors, as well, allowing you, for example, to retrieve elements with specific attribute values or that are in specific states (e.g. selecting only hidden elements). You can view a complete list of selectors in the jQuery API to see all of the possibilities.
Altering elements’ appearances with jQuery
Now that you know how to go about selecting elements, we can get into the fun stuff: using jQuery to modify and manipulate those elements.
As always, let’s start with something basic. Say we have a few HTML div elements, and we want to turn the first one red. We could use the following code to accomplish just that:
<div id="box1">This is box 1</div>
<div id="box2">This is box 2</div>
<div id="box3">This is box 3</div>

<script>
  $('#box1').css('background', 'red');
</script>
There’s are a few things to note about the code above. First, when you’re including JavaScript code in amongst HTML code, it must be surrounded by script tags, as shown. That tells the browser that it’s looking at JavaScript code, which allows it to process it properly.
Secondly, you’ll notice the use of jQuery’s .css() function, which allows us to modify CSS properties of HTML elements using the following format:
elements.css('property-name', 'property-value');You’ll also notice the use of another extremely handy jQuery feature: method chaining. Method chaining allows you to, one right after another, select elements and then immediately call another function to modify them, utilizing the .functionName() syntax.
And you’re allowed to chain an unlimited number of functions together. So if we wanted to also turn our box’s text white, we could modify our code to read as follows:
$('#box1').css('background', 'red').css('color', 'white');Great! You now have a basic understanding of how to utilize jQuery to retrieve and manipulate HTML elements, but we still haven’t really added any user interactivity. Don’t worry — jQuery can help out with that, as well.
Adding user interactivity with jQuery
Let’s build on our previous example to demonstrate how jQuery can be used to add some user interactivity to a page.
Instead of automatically altering the our div’s background color, let’s add a button that, when clicked, will alter it — some real interactivity!
And yet again, jQuery makes doing just that quite simple:
<div id="box1">This is box 1</div>
<div id="box2">This is box 2</div>
<div id="box3">This is box 3</div>
<button id="change_box1">Click me to change the first box!</button>

<script>
  $('#change_box1').click(function() {
    $('#box1').css('background', 'red').css('color', 'white');
  });
</script>
We start by adding our button, giving it an id value of change_box1, so that we can access it, and assigning a click event handler to it. JavaScript gives us the ability to assign event handlers to HTML elements, which allows said elements to react to user actions. So in our case, our code is saying, “Hey! Look out for when the user clicks the change_box1 button, and when they do, change our box1 element’s background and text colors!”

Note that the jQuery .click() function makes this very easy. It may seem a bit odd that the argument .click() accepts is also a function, but that’s perfectly legal in JavaScript. And in the case of assigning an event handler, it’s absolutely necessary. The function we’re passing in contains the code we want to execute when our designated event, a user click in this case, occurs. And in order to pass in a block of code to be executed, it needs to contained within a function.
You now have all of the foundational building blocks in your arsenal required to add user interactivity to a webpage: 1) the ability to select HTML elements; 2) the ability to alter those elements; and 3) the ability to configure those elements to respond to user events.
Part 2: Interactive lesson: enhancing our New Year’s Resolution list by adding user interactivity
Suffice it to say that jQuery can be used to do a whole lot of different things, and we could spend plenty more time investigating them all, but I think we’ve talked enough at this point to give you a great starting point. It’s time to start doing and give you a chance to really put your new skills into action.
As in Lesson 1, the steps for the activity are shown in the left-hand column, below. You’ll notice that each step contains tips, but try completing them on your own, first! The best way to learn how to code is by doing. If you get stuck (which is totally fine, and will inevitably happen at points), then seek some help. Trust me on this one.
The interactive code editors for the activity are shown in the middle column. You’ll be entering your HTML and JavaScript code in the top and bottom editors, respectively. You’ll notice that when you make changes in one of the editors and then click out of it, the “Webpage Preview” in the right-hand column is automatically updated to reflect the code you’ve entered. And the editors will automatically save your progress, so don’t worry if you have to leave or refresh the page. You can always come back and finish everything up later.
Resources to help you out
The foremost goal of the Mini Web App lessons is always to help you learn new skills, as effectively as possible. While some of the exercises below may be a bit of a challenge (you are learning something new, after all!), it’s my goal to make sure you have the tools you need to work through them without getting overly frustrated or overwhelmed.
With that in mind, for every Mini Web App lesson from here on out, I’m going to provide you with a list of resources, on a step-by-step basis, to ensure you have all of the information you need to complete the tasks. You don’t necessarily need to (and probably shouldn’t) visit all of these resources right now, though. Go ahead and jump into the interactive exercise below, and if you get stuck, then come back and reference the resources.
Here’s the list for this week’s exercise:
Step 1
- HTML: Create an input and create a button
- JavaScript/jQuery: Add a click event handler with jQuery
Get an input’s value with jQuery
Create an alert box in JavaScript
Step 2
- HTML: Lists and list items
- JavaScript/jQuery: Joining multiple strings into one with JavaScript (see the “The + Operator Used on Strings” section)
Append HTML to an element with jQuery
Step 3
- HTML: Create a span
- JavaScript/jQuery: Click event via jQuery (see Step 1)
Add a blur event handler with jQuery
An alert box via JavaScript (see Step 1)
Step 4
- JavaScript/jQuery: Get an element’s text with jQuery
Get an input’s value with jQuery (see Step 1)
Show an element using jQuery
Hide an element using jQuery
Step 5
Step 1: Add an interactive text input and button
Start by adding a text
input and a button to the bottom of the HTML code, making sure to assign both of them id values, so that we can access them with jQuery.Once you've added those elements, set up a
click event handler for the button, that, when clicked, will display the value of the text input in an alert box.
<div>
<input id="resolution_name" type="text"> <button id="add_resolution">+ Add Resolution</button>
</div>id values than the ones used above, just remember that you'll have to reference whatever values you use when writing your JavaScript/jQuery code.
button and establish a click event handler using the following (note that you need to use whatever id value you assigned to your button):
$('#add_resolution').click(function() {

});
$('#add_resolution').click(function() {
  alert($('#resolution_name').val());
});alert() function is used to produce the alert box while the jQuery .val() function is used to retrieve the input's text.
Step 2: Alter the form so it adds new resolutions
Start by removing the current code inside of the
click function, and add a line that simply retrieves the text input's value and stores it in a variable named resolutionName.Once that's done, create another variable, named,
resolutionItemHTML, that holds an HTML string that represents a list item, using the previously-created variable to place the text from the input within the list item's tags.Finally, append that HTML string to the New Year's Resolutions list object. Remember, you'll want to add an
id attribute to the existing list ul item so that you can easily access it when setting up the functionality to add the new list item.Note: You'll notice, once you've completed this step, you'll be able to dynamically add new resolution items, which is great! But, you'll also notice that every time your "Webpage Preview" is refreshed that they'll disappear. Why is that?
Well, when it's refreshed, it's using the HTML code from your HTML code editor box, which doesn't contain your dynamically-added items -- that's why! In a later lesson of the New Year of Coding, we'll learn how to keep those dynamically added items around, but for now, just know that it's correct that they're disappearing.
resolutionName variable:
$('#add_resolution').click(function() {
  var resolutionName = $('#resolution_name').val();
});resolutionItemHTML variable to hold the new list item's HTML, your button click code should look like this:
$('#add_resolution').click(function() {
  var resolutionName = $('#resolution_name').val();
  var resolutionItemHTML = '<li>' + resolutionName + '</li>';
});<li> tag, and you can join multiple strings into one simply by using the + operator.
id attribute value to the resolution list ul HTML element. Assuming an id value of resolution_list was used, your final click code should look like the following:
$('#add_resolution').click(function() {
  var resolutionName = $('#resolution_name').val();
  var resolutionItemHTML = '<li>' + resolutionName + '</li>';
  $('#resolution_list').append(resolutionItemHTML);
});<li> tag, and you can join multiple strings into one simply by using the + operator. jQuery's .append() function is used to add the new list item's HTML to the end of our list.
Step 3: Add inline editing for resolution items (part 1)
The ultimate goal is to make it so that when a you click the text of one of the resolution items, that text is hidden, and a text box appears allowing you to edit the resolution. Then, when you click outside of the text box, it's hidden and the resolution is automatically updated to the newly-entered value.
In order to add inline editing, the first thing we need to do is make a few HTML changes/additions: 1) wrap the text inside of all our current list items inside of
<span> tags (so you'll have span elements nested inside of each of the li elements); and 2) add a text input inside of every li item in our list.There are two user interactions we'll need to handle: 1) when you click a resolution's text (the
span elements); and 2) when you click out of the text box (the text input elements).Let's set up event handlers for those events. The first should be a
click event for the span elements inside of the resolution list items.The second should be a
blur event (the name of the event used for when you click out of an input) for the input elements inside of the resolution list items.Finally, add an
alert() inside of each of the event functions with a simple alert message, just so you can be sure that they're set up correctly.
We'll add the additional functionality within those event functions in the next step.
span tags and add text input elements inside of each. Your updated list HTML should look like this:
<ul id="resolution_list">
<li><span>My first resolution</span><input type="text" /></li>
<li><span>My second resolution</span><input type="text" /></li>
<li><span>My third resolution</span><input type="text" /></li>
</ul>$('parent-selector child-selector')parent-element represents the selector for the parent, or outer element (such as our list, #resolution_list), and child-element represents the selector for the child, or inner element (such as our span).
span and input elements within our list items, just as we've done in the past. The code that you should add to the bottom of the JavaScript editor is as follows:
$('#resolution_list span').click(function() {
  alert('item span clicked');
});

$('#resolution_list input').blur(function() {
  alert('item input blurred');
});Step 4: Add inline editing for resolution items (part 2)
input elements will be used for editing the items' text, but they should be hidden unless an item is being edited. Add code to hide the input items inside of the list.Now we need to set up the dynamic inline editing functionality. In both the
click and blur event functions you created in the previous step, first remove the alerts, and then add a statement (in both) that retrieves the element's parent list item and stores it in a variable, listItem.Then, within the
click function, using that variable that references the parent list item, use jQuery to find the input element within the list item and store that in its own variable, itemInput. Likewise, within the blur function, find the span element within the list item and store that in its own variable, itemSpan.Now we just need to add the code that's responsible for showing/hiding the proper elements and altering their text and values.
Within the
span element's click function, first add a line to get the current text inside the the span and set the input element's value to that text. Finally, hide the span and show the input.Almost there! The final step is to implement the flip side of the previous functionality within the
input element's blur function. First update the text of the span to the new value of the input, then hide the input and show the span element.
Note: Just as in Step 2, when the "Webpage Preview" refreshes, it will reset any inline edits you've made to your resolution list items, as it'll be using the code in the HTML code editor.
$(this). Additionally, you can retrieve an elements parent using the .parent() function. And finally, you can find element(s) within other element(s) using jQuery's .find() function:
parentElement.find('inner-element-selector');button elements within an item with the id of specific_element:
$('#specific_element').find('button');input using jQuery's .val() function. And you can retrieve the inner text of an HTML element using jQuery's .text() function.
.show() and .hide() functions.
$('#resolution_list span').click(function() {
  var listItem = $(this).parent();
  var itemInput = listItem.find('input');
  itemInput.val($(this).text()).show();
  $(this).hide();
});

$('#resolution_list input').blur(function() {
  var listItem = $(this).parent();
  var itemSpan = listItem.find('span');
  itemSpan.text($(this).val()).show();
  $(this).hide();
});
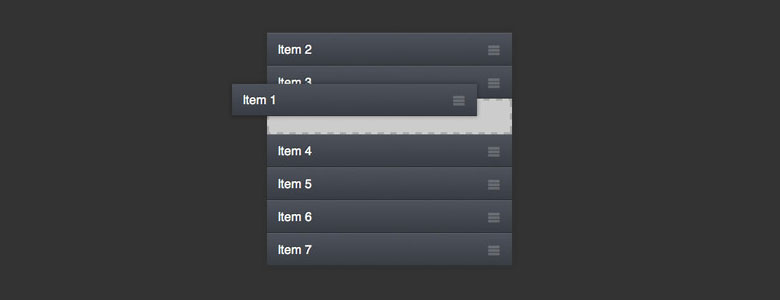
$('#resolution_list input').hide();Step 5: Implement drag-and-drop list item reodering
Our last step may be the simplest in terms of implementation, while at the same time being the most fun, in terms of user activity.
Go ahead and make our New Year's Resolution list items sortable, via drag-and-drop, using jQuery UI. (Hint: it will only require one line.)
And once you've successfully made the list items sortable, you should be able to simply drag them up and down to reorder them. How cool!
$('#resolution_list').sortable();Part 3: Putting your new skills into action
As with every Mini Web App lesson, one of the goals is always for you come away with ways to put your new expertise and skills into practice right away. Here are a few ways you can begin using your new knowledge of JavaScript and jQuery today:
Explore the jQuery API and jQuery UI demos and documentation
As I mentioned, the jQuery functionality we touched on in this lesson is really only the tip of the iceberg. Go ahead and explore the wonderful jQuery API documentation and jQuery UI demos and documentation on your own to get a feel for some of the other things you can accomplish.
They both contain thorough, detailed documentation on every function jQuery and jQuery UI provide. Useful examples are provided throughout, demonstrating how you can use the functions on your own, and providing you with the code to do so.

You can also go through the Try jQuery course, produced by the wonderful folks over at CodeSchool. It contains tons of additional information about using jQuery, and if you’ve gone through the Mini Web App lessons one (Creating a webpage with HTML and CSS) and two (this one), you should be well prepared to take it all in.
Experiment with adding additional functionality to our New Year’s Resolution list
One of the best ways I’ve found to learn coding (and most things, for that matter) is to constantly be building on top of what you already know and things you’ve already done. A great way to do that is to experiment with adding some additional functionality to the New Year’s Resolution list we created in Part 2, above.
I’ve packaged up all of the files used to create the New Year’s Resolution list in its final form (i.e. the code you would end up with after working through all of the steps in the exercise), and you can download it here. Simply unzip that file and open up the index.html and script.js files in your text editor (TextEdit on Mac and Notepad on Windows both work just fine). Note that the style.css stylesheet is also included, but you shouldn’t need to make any changes to it (unless you’d like to change the list’s appearance, of course).
With the files open, here are a few things for you to try and implement:
- Add delete buttons within each list item that, when clicked, remove that item from the list.
- Add the ability to sort the list alphabetically, when a button is clicked.
- Building on #2, add a
selectdropdown element with two options, “Sort A to Z” and “Sort Z to A”, which, when changed, performs the appropriate sorting of the list items, based on the option selected. - Use jQuery UI tooltips to add descriptions for each resolution item that appear when hovering over them.
Remember to reference the jQuery API documentation and jQuery UI demos and documentation for assistance along the way. The Stack Overflow community can also prove to be immensely helpful for trying to figure things out while coding. Remember, never be afraid to ask for help!