This is lesson five of a 10 ten-lesson course, Simple CodeIgniter App, which walks you through the creation of your first PHP web application using the CodeIgniter framework.
Since you now have an initial understanding of the role data will play in our web app, we can dive into some other aspects.
But before we do that, let’s go through our app’s desired functionality in a bit more detail.
So, what will our web app do?
We know, at the core, that our app will be a todo list app. On a more granular level, our app should ultimately:
- Allow us to view existing todos
- Allow us to add new todos
- Allow us check off/complete todos
Based on that list, there’s one major type of element that will play a role within the app: todos.
When building our app, we’ll be organizing it around the roles of those todo elements, or objects, as they’re frequently referred to in web development.
Object-oriented programming
Object-oriented programming is the development paradigm based on exactly that concept—of building functionality around your main objects (todos, in our case).
It involves representing the data throughout the app in the form of objects. So instead of considering pieces of data on their own, such as “this is a task description”, we’ll consider every piece of data as belonging to a certain object, such as “this is the task description of a todo.”
And when you think about it, it makes a whole lot of sense to think about our data in this way. It’s very similar to how we think about the same data in real life.
Say we were representing cars, for example. There are many different pieces of information required to describe a single car: the make, the model, the color, etc. A single car can’t be described without multiple pieces of information.
With that in mind, you can think of all of the data in an app as a collection of objects. And those objects can presented in different ways in order to form a cohesive web application.
The flow of a web app
When talking about building a web app, it’s very important to understand how everything flows throughout so that you always have a good understanding of the context you’re working within at any given point in the process.
We discussed the roles of the front end and back end in Week 1 and how they interact with one another.
And you’re already aware of the role that data and a database will play, as per Week 3.
Now it’s time to learn how everything fits together in the web app as a whole.
From a high level, it looks like this:
- A user requests to view a certain page within a web app, by opening their browser and entering a URL
- The app determines what page needs to be displayed, based on the URL that was entered. (Don’t worry—we’ll talk more about how this works in practice later on.)
- The data required for that page is requested, and retrieved, from the database.
- Any necessary calculations, manipulations, and reorganizations required are performed on that data.
- The resulting data is used to render the page’s display.
- The page is shown to the user.
In order to construct the flow above, our web app will be structured based on the model-view-controller pattern, otherwise known as MVC.
The Model-View-Controller Pattern (MVC) and its role in the flow of the app
This is a key part of understanding a web application as a whole.
The MVC structure is based on the presence of three main components (and these may come as a shock…): models, views, and controllers. They all play very important roles in the flow described above, and all are required to allow our web app to function as desired.
Models: representing the data
In MVC, the models are responsible for representing our data; more specifically, they’re responsible for representing our data objects (which we discussed earlier).
They’re also responsible for communicating with our database—retrieving, inserting, updating, and deleting the data stored within it.
Models are made up of two major “parts”: fields and methods.
Model fields
As mentioned, one of the the things models are responsible for is representing our objects. Fields are responsible for representing the various pieces of data within an object.
Let’s take our good objects as an example. Each todo will have a task description and a completion status. When represented by a model in our app, all of those pieces of information for a todo are represented as fields.
Model methods
Methods are used to provide extra functionality within our models. They allow us to manipulate the model’s initial information or perform additional actions related to the data they represent.
Maybe most importantly, a model’s methods are used to communicate with our database. We’ll be creating methods to retrieve existing data from our database, insert new data, and update and delete data.
(Model) objects
Models can be used to represent data objects, in a general sense, so our todo model would represent the general format for a todo. But what if we want to represent a specific data object—say a “take out the trash” todo?
In that case, we would create an object based on the model, also known as an instance of a model. You can think of a model as a template for a type of data object, and an object as a specific example of that template, as depicted below.

Objects are created based on the model, but they stand on their own. They can interact with each other and are treated as their own, individual entities.
Say, for example, we wanted to display a list of five todos. We would retrieve the data for those five todos from our database represented as five different todo objects. We would then be able to use those five todo objects as needed, within our app. We’ll talk more about that later in the section about controllers.
Wrapping up with models
Models help us represent our data objects. They contain two major components: fields and methods.
They also interact with all of the information in our database related to the type of object they represent.
Pieces of information are stored in the model’s fields, whereas additional functionality is added via the creation of model methods. In order to represent specific items, we create objects based on our model.
Controllers: the behind-the-scenes workhorses
When you visit your Facebook profile, you’re immediately presented with your personal information and a list of all of the posts you’ve made. But how are both your personal information and those posts gathered and organized appropriately before they’re shown to you?
Controllers are where a lot of that type of magic happens.
As we just discussed, models help us represent our data objects. But when it comes to determining what objects to retrieve and how to organize them (so that they can be displayed appropriately to the viewer), that’s where our controllers come in.
Handling user requests
Controllers are responsible for handling user requests. When you visit your Facebook profile page, for example, you’re making a request to the Facebook web app, telling it that you would like to view your profile.
In the background, the Facebook app is doing the following:
- Well, based on the URL that was entered, it appears that the profile for the username
mrmiyagi(for example) was requested. - Let’s get the personal information for
mrmiyagi. - Also, get the first couple photos associated with
mrmiyagi. - And finally, get the 10 most recent posts made by
mrmiyagi. - Additionally, find out how many “Likes” each of those posts has received, and retrieve any comments that were made.
So you can see that there are a whole bunch of things going on when you request to view your profile page!
A web app’s controllers are responsible for making sense of a user’s requests; retrieving the proper information; and passing it to the proper view (which we’ll discuss in detail very shortly) so it can be displayed appropriately to the user.
Different requests are handled by different controller actions
We know that the controller is responsible for handling user requests, but there are all different kinds of requests a user can make, right? So how does a controller go about handling those various requests?
Controllers contain different actions which are responsible for handling each of those different requests. Actions are similar to model methods in that they also contain a certain set of instructions to execute when they’re called upon.
When a user makes a request, the type of request is detected based on the URL entered, and their request is routed to the appropriate controller action. Each controller typically handles multiple different types of requests, and thus has multiple different corresponding actions.
We’ll go into more detail about routing in a later lesson, but suffice it to say that it generally works as follows:
- user enters URL;
- type of request is determined based on the URL (e.g. a URL ending in
account/settingsis likely a request to view an account settings page); - the corresponding controller action for the determined request type is called upon.
Views: what the user sees
We now know that we use models to represent, and interact with, our data and controllers to retrieve and organize the data required for a specific user request. But now that we have access to all of that data, how do we display it in the proper format?
You guessed it—by using views.
Views are responsible for the presentation layer, or the actual visual displays that you see when viewing a page within a web app.
Each individual page within a web app typically has its own view.
So you could, for example, have a home view, a profile view, and a settings view, which would be responsible for the display of the homepage, profile page, and settings page, respectively.
A view’s content
Views contain HTML code—to construct the page’s layout and physical structure— as well as PHP code—to inject our objects’ information that’s passed to the view via a controller.
Take our Facebook profile example. As we discussed, our controller retrieved all of the necessary data and objects. But now we need to take that data and display it to the user.
As mentioned above, our controller passes all of the information it retrieved to our view. Within our view, we then have access to those data objects and can display their information appropriately, within our page’s structure.
A simplified version of the Facebook profile view might look something like this:
<section id="personal_information">
<?php
  // Use PHP code here to display the user's personal information
?>
</section>

<section id="photos">
<?php
  // Use PHP code here to display the user's photos
?>
</section>

<section id="posts">
<?php
  // Use PHP code here to display the user's posts
?>
</section>
You can see how we could use a combination of HTML—to structure the page’s layout—and PHP—to insert all of the data we retrieved—to build a complete page to display to the user.
All together now
We discussed them all one-by-one, but as with anything else, it’s helpful to consider all of the pieces of the MVC puzzle together.
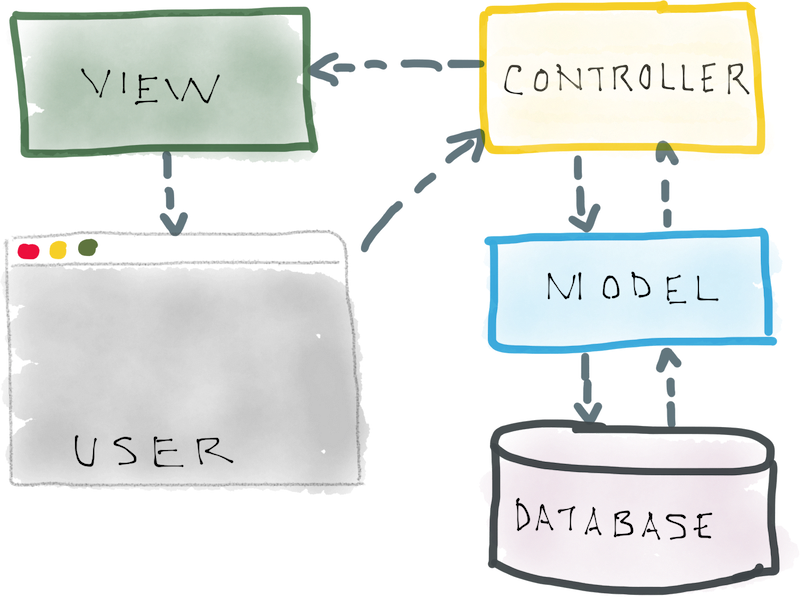
Again, as shown in the figure above, the sequence tends to go like this:
- User makes a request to view a page within the app
- The type of request is determined (usually based on the URL entered)
- The controller action that corresponds to that of request is called.
- That controller action leverages the necessary models to retrieve all of the required data objects.
- The controller manipulates those objects as necessary.
- The corresponding view is called from the controller action and passed the data objects.
- The view is rendered and displayed to the user.
And going through that same flow with our Facebook profile example:
- User visits the URL
facebook.com/mrmiyagi - The Facebook app determines that the user is request to view the profile of
mrmiyagi. - The Facebook app’s User controller’s profile action is called (operating under the assumption that the Facebook app contains a controller to handle their user-related requests…)
- The profile action retrieves
mrmiyagi’s personal information, most recent photos, and most recent posts. - The necessary personal information is organized and the photos and posts are ordered so that the most recent items will appear first.
- The profile view is called and passed all of
mrmiyagi’s information. - The profile is rendered, and the user who originally entered the
facebook.com/mrmiyagiURL now seesmrmiyagi’s profile in their browser.
You now have a solid, foundational understanding of how requests will be handled by our web app, which is extremely important. You know what happens behind-the-scenes when you make a request to a web app—such as to view your own Facebook profile—and, soon enough, we’ll put all of these concepts to use in your own web app.
But in order to actually build our app, there’s a lot of functionality we’ll need to incorporate.
Luckily for us, we aren’t the first ones to have ever pursued this endeavor, and others have very kindly built what are known as frameworks to aid in implementing a lot of the more common features of a web app.
What is a framework?
A framework is like the foundation of a house. It’s underlies the house, and is required as a strong base upon which to build. But it’s just that—a starting point. What you build on top of that foundation is what really defines the house and makes it what it is.
The same is true when using a framework to build a web app. It provides that strong foundation, but the custom functionality we’ll build on top of the foundation the framework provides will define our app.
To build our app, we’ll be utilizing the CodeIgniter framework.
Week 5 Task
1. Installing CodeIgniter
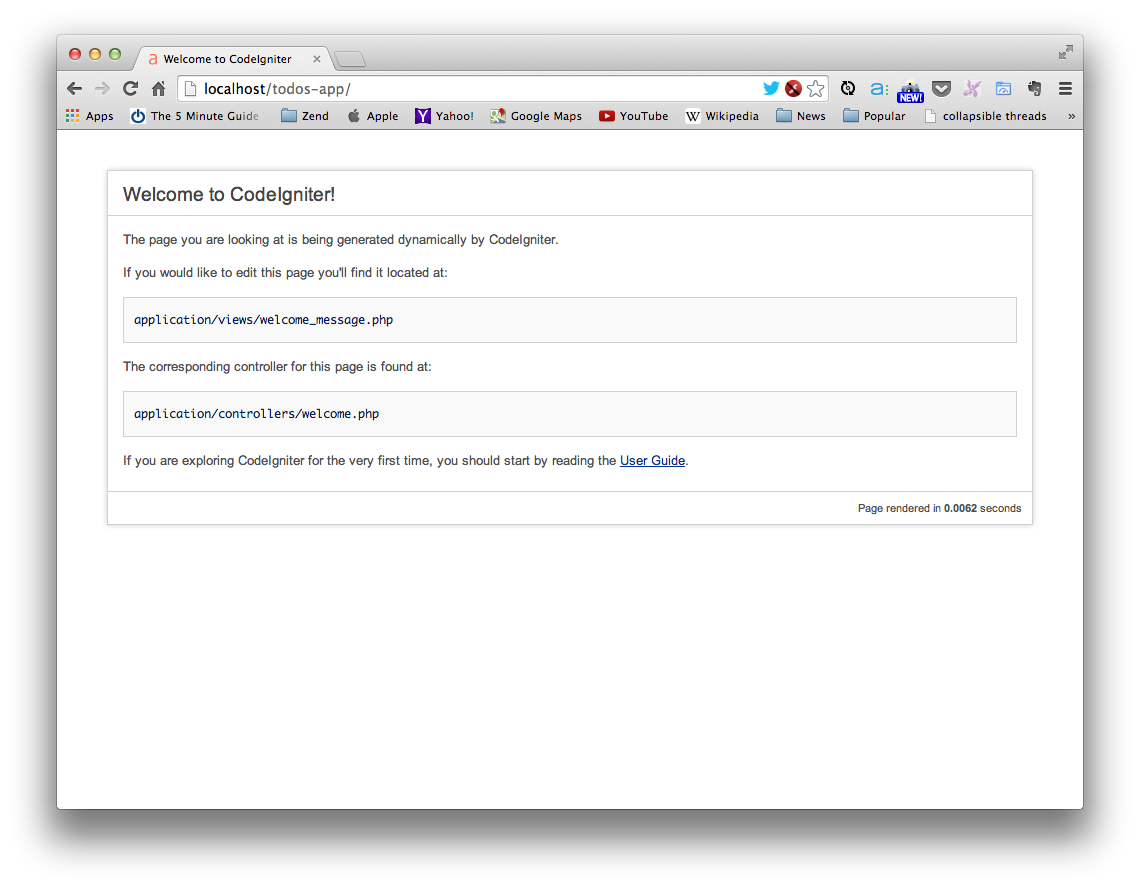
Head over the CodeIgniter (CI) site—http://ellislab.com/codeigniter— and click the “Download” button, which will prompt you to download a .zip file containing the CodeIgniter code.
Download that file and copy it to your main web directory (again, C:wampwww by default on Windows, and /Applications/MAMP/htdocs by default on Mac), and unzip it. Rename the resulting folder from CodeIgniter_XYZ to todos-app.
Open up a browser window and enter the following URL (which corresponds to the folder we just placed in our main web directory):
You should see the “Welcome to CodeIgniter!” screen, as shown in the image below, which is exactly what we were hoping for!
2. Investigating and changing the Welcome page
That initial “Welcome to CodeIgniter” page you’re presented with gives you some hints as to how it’s being generated.
Go ahead and open up all of your new todos-app folder in Sublime Text—containing all of the CodeIgniter files—and see if you can find the specific files used to render the Welcome page.
If you find files, make some changes to the content of the page, and leave a comment below describing what you were able to do.