This is the first installment of Behind the Scenes: The Creation of a Web Application.
Imagine this…
It’s 1929 in New York City. Your boss approaches you with the firm’s next big project: “We just won a life-changing contract to construct a new office skyscraper on Fifth Avenue to compete for the title of ‘world’s tallest building.’ It will be named the Empire State Building. What are our next steps?”
Would your answer have been “I’ll call our suppliers, buy some steel and some stone and we’ll start building this thing!” I would certainly hope not.
And put in that context, it sounds quite silly. But when presented with a complex task, all too often I notice people, myself included, rush to immediately start doing things…
“So we’ll start by doing this. And then that. Oh, and then we’ll do that!” All of that without any planning. In fact, without really even considering any.
Sure, maybe planning isn’t always the most enjoyable piece, but I’ll tell you what, it most definitely makes all of the “doing” a heck of a lot more enjoyable down the road. A tradeoff I’m certainly willing to invest in.
Let’s face it, building an entire web app is a complex task. No matter how “simple” the web app may be in terms of functionality, creating one is still a process that involves a lot of moving parts, requiring a lot of considerations and precise execution.
As such, starting with a good plan makes all the difference between a great and an unusable end product.
How to make the most useful plan
So, as you may have guessed, the first thing I do when building a new web app is make a plan. Beyond being (essentially) a required first step, a comprehensive plan with precise objectives will save me boatloads of time down the road.
How?
1. Well-defined goals = straightforward execution
If we know what we want to accomplish, it makes it much easier to get there. Seems simple, right?
As you’ll see, after we define a detailed list of objectives for the app, it becomes infinitely easier to proceed with building it.
We’ll begin by defining what we need to end up with — the broad, major goals of the app. From there, we can work backwards until we’ve defined steps that are granular enough to be turned into individual actions we can execute.
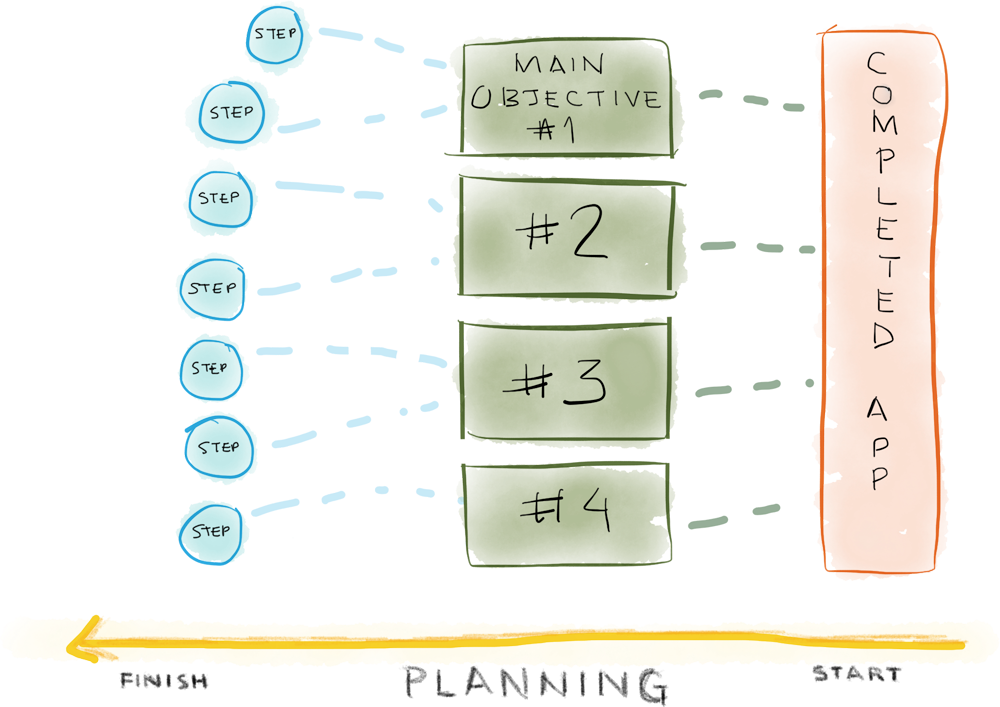
Naturally, executing those actions will allow us to reach our end-goal, the completed app. (This is true, by definition, as we’ll start with the final objectives, deriving all of the required steps from them.)
2. Start small, grow later
The other cornerstone philosophy we’ll employ is another simple, oft overlooked one: start small, grow later.
The features of a new app should be small, restricted. The app should provide the least amount of functionality necessary. We certainly don’t want to leave out anything crucial, but we’ll refrain from including a bunch of extra features right off the bat that users may or may not even find useful.
And an über-benificial byproduct of defining a small, restricted set of initial requirements for the app is that we’ll be able to build it rapidly.
In software development, this is called creating a Minimum Viable Product, or MVP. It allows for building an initial version of an app very quickly and then adding additional features down the road, after real users are actually interacting with the app.
So as opposed to including a ton of features right off the bat — “I think users would enjoy ‘feature X’… let’s build it!” — we gradually add features that users actually want — “Users have expressed a need for ‘feature Y’…so we’ll add it!”
Shortest build time + adding only desirable features = focused app + huge time savings = WIN.
Defining the app’s objectives
In order to define the app’s objectives, we’ll work from broad goals backwards toward specific, actionable items. By the end, we should have a list of steps we can take in order to start down the path of creating the app — exactly the intention.
Let’s start with the most general.
Most general
In the most general sense, our app needs to do one thing:
- Host an online course
That’s it! But standing alone, that objective doesn’t help us decide how to act. We need to dig in and break it down to make it more useful.
A bit more specific
“Host an online course” obviously implies certain functionality. But ultimately, we don’t want this to be a guessing game — we want the desired functionality spelled out (almost) as specifically as possible. So let’s break it down a bit further:
- Display online course content
- Allow others to view courses
Now we’re getting closer. And, in fact, those will be the two most important aspects of the app.
There are two additional pieces of functionality that I want to include. Note that these items could be done manually, but for a variety of reasons — mainly that they’re relatively easy to implement and very useful — we’ll include them:
- Display online course content
- Allow others to view courses
- Administer course content
- Process course subscriptions
And there you have it: our four major objectives!
Even more specific
We’ve now defined our major objectives … but they’re still too general to execute on.
We can’t very well take “display online course content” and say to someone “Okay, start building!”
A likely response: “Well, umm … what should I do first?” A reasonable question.
One of the major goals of this exercise is to prevent the need to ask questions like that one. We want to end up with individual objectives that are saliently actionable. That it’s easy to say “Okay, so based on item X, we need to do Y in order to implement it. I’ll get right to it!”
With that in mind, let’s go through each of the four major objectives and break them down further.
1. Display online course content
Let’s start by breaking down the first objective of displaying the course content:
Display course content
- View course overview (name, lessons)
- View individual lessons
Simple enough. Just two things are necessary: the ability to view a course’s “overview,” a list of all its lessons; and the ability to view each of the individual lessons.
2. Allow others to view and interact with courses
This is arguably the most in-depth objective, because it includes two major concepts: users as well as their interactions with courses.
First, the user portion:
Allow others to view and interact with courses
- User accounts (login, logout, basic info.)
- Profile with subscribed courses
We, of course, need to allow users to create accounts and perform all typical account-related actions — logging in and out, and providing basic information. Additionally, we’ll provide users with a basic profile where they easily view and access the courses they’re subscribed to.
Now the course interaction pieces:
Allow others to view and interact with courses
- User accounts (login, logout, basic info.)
- Profile with subscribed courses
- View course overviews
- View course lessons
- Complete course lessons
- Ask questions / give feedback
Users need to be able to view course overviews and lessons, with the app checking to make sure they have access (i.e. a subscription to the course). Additionally, they need to be able to mark lessons as “completed” as well as ask questions and give feedback.
3. Administer course content
Basically, we need the ability to create a new course and alter its lessons. Additionally, access to this portion of the app needs to be restricted to admins only. We can’t just have anyone making changes to the courses.
Administer course content
- Restrict access to admins only
- Add/edit/delete courses
- Add/edit/delete lessons
4. Process course subscriptions
Almost there! The final piece is payment processing and granting user course access, restricting users from accessing courses unless they have an active subscription.
Process course subscriptions
- Process payments
- Grant user course access
The final list of objectives
Let’s view our final list, altogether:
- Display course content
- View course overview (name, lessons)
- View individual lessons
- Allow others to view and interact with courses
- User accounts (login, logout, basic info.)
- Profile with subscribed courses
- View course overviews
- View course lessons
- Complete course lessons
- Ask questions / give feedback
- Administer course content
- Restrict access to admins only
- Add/edit/delete courses
- Add/edit/delete lessons
- Process course subscriptions
- Process payments
- Grant user course access
Note how each “sub-objective” is actionable. We could very well say “We need to implement the ability in our app to view a course overview” and be able to, relatively easily, devise a list of tasks to accomplish that.
Reading through the list, you’ll also notice that our app won’t do too much, but it will absolutely do everything necessary. This is the essence of a true MVP.
This is a big first step. We’ve laid the groundwork for the entire rest of the process. The app’s features are now well-defined, which will allow us to move forward smoothly. Remember, planning is a huge part of the process.
Next steps
Now that we have our app effectively “outlined,” what’s next?
Next, we’ll be putting our “outline” into action, using it to design all of our app’s pages. Stay tuned!
