This is the second installment of Behind the Scenes: The Creation of a Web Application. In case you missed it, check out the previous article on planning a web application.
Previously, we planned the online course web application’s main objectives. Now it’s time to use those objectives to generate designs of our app’s pages.
The creative process
As in many other visually-based creative processes — say architecture, comics, or furniture design — the first step is typically to sketch out your basic ideas. Well, designing the pages of a web app is no different.
In terms of web apps, these “sketches” are typically known as wireframes. Wireframes are illustrations — of varying different mediums and levels of complexity — created to convey the general components and their layout of the various pages in a website or web application.
When creating a wireframe, the main goal is to convey how a given page will accomplish its intended goal. It is not typically the job of a wireframe to present the polished look-and-feel, or final aesthetics, of a page. That comes later.
As depicted below, my overall process when building a complete web application progress as follows: general ideas -> main objectives -> wireframes -> coding the pages with their core functionality -> implementing the final, polished design. (It is worth noting that many variations on this process exist. This is just the flow that works best for me.)

My Web Application Creation Process
Going “low fidelity”
As a friend recently said, “technology can limit creativity.”
It’s with that sentiment in mind that I always begin the process of designing a web application’s pages using good old pen and paper. More specifically, graph paper, in my trusty Moleskine design notebook.
While there are plenty of the other more “advanced” technological solutions available for creating wireframes, I feel that sketching things by hand, at least initially, provides the necessary freedom to most succinctly translate ideas to designs.
From plans to pages
As you’ll see time and time again, our great deal of planning always pays off.
In this case, we’ll use our list of objectives — created previously when we planned the web app — to determine the different pages our application will require. As a reminder, here’s the complete list of objectives:
- Display course content
- View course overview (name, lessons)
- View individual lessons
- Allow others to view and interact with courses
- User accounts (login, logout, basic info.)
- Profile with subscribed courses
- View course overviews
- View course lessons
- Complete course lessons
- Ask questions / give feedback (at the lesson level)
- Administer course content
- Restrict access to admins only
- Add/edit/delete courses
- Add/edit/delete lessons
- Process course subscriptions
- Process payments
- Grant user course access
Based on our objectives, there are three main sets of pages we need to consider:
- Course-related pages
- User-related pages
- Administration pages
Let’s go through each set of pages in turn. (Note that I would typically create a list of all of the individual pages required first, and only then sketch their wireframes. But for the sake of presentation, I’m going to show you the wireframes as we go through and generate our list of pages.)
Course pages
The course pages that are required can be pulled directly from our first objective, to “display course content”:
- View course overview (name, lessons)
- View individual lessons
Those two items directly translate to two individual pages:
- Course overview page
- Course lesson page
We need: one page to view a course overview, which will include its name and list of lessons; and one more page to view individual course lessons.
Course Overview page
This will be a simple page. It needs only to display:
- The course name
- A list of lessons, in a clear, easy-to-read manner (each linked to their individual lesson pages)
At this point, we already have enough information to create the first wireframe. It’s pictured below.
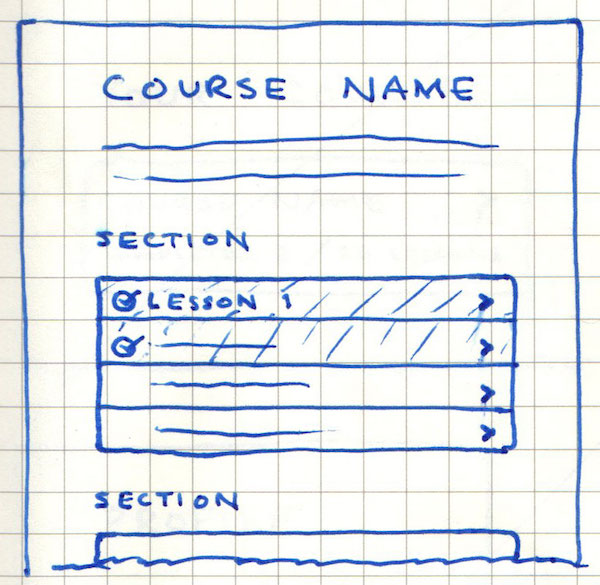
Course Overview Page Wireframe
As mentioned, there’s not much to it, just the course’s name and a list of its lessons (divided up into sections), with the completed lessons visually highlighted.
Course Lesson page
The page to display each individual lesson will be slightly more involved.
It needs to display the following information:
- The lesson name
- The lesson content
But there are also a few additional items related to user interactions that we need to consider:
- The ability to complete course lessons
- A way to ask questions (to get assistance)
- The ability to navigate to the next lesson
To address the items above, the page will also need to include a Complete button, a Next button, and a “Questions” form. So our page’s final list of contents is as follows:
- The lesson name
- The lesson content
- A Complete button
- A Next button
- A questions form
Back to the drawing board. The wireframe I created, with all of the above in mind, is shown below.
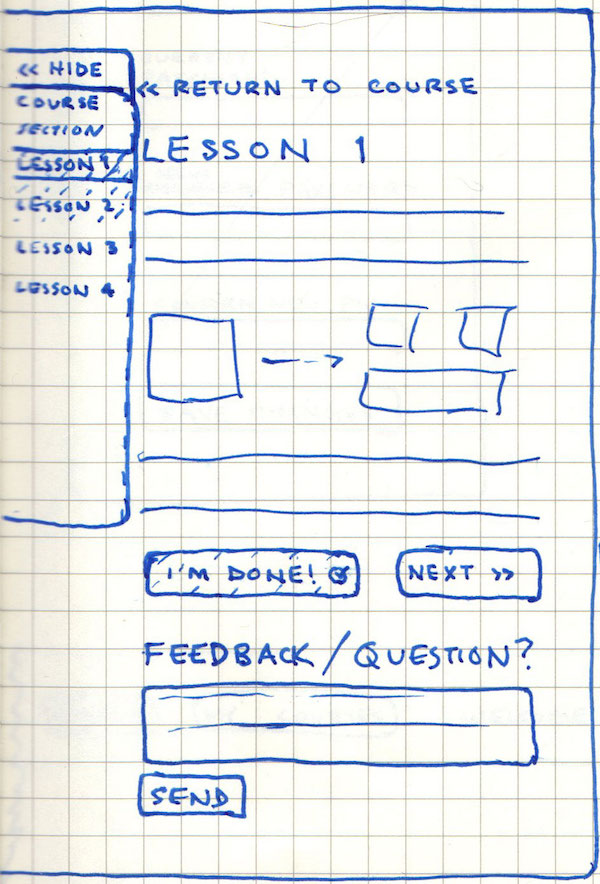
Course Lesson Page Wireframe
You’ll notice there’s one additional element on the left, a list of some sort. I wanted to allow the user to easily view, at a glance, the complete list of course lessons, highlighting where the current lesson falls within that context. For that reason, I added the mini course overflow panel pictured in the wireframe.
In order to be as unobtrusive as possible, the panel will also be collapsible. Clicking the Hide button at its top will hide the list, as shown here:

Course Lesson Page Collapsed Overview Panel
And with that, we now have wireframes for all of our course pages. Let’s move on to the user pages.
User pages
Again, referencing our list of objectives, we can extract the following user-related items:
- User accounts (login, logout, basic info.)
- Profile with subscribed courses
To handle typical user account stuff, we’ll need a login page, an account page — where the user can update their basic information — and a reset password page. And finally, we’ll need a profile page to display the courses the user is subscribed to.
So we need four pages in total:
- Login page
- Account page
- Reset password page
- Profile/courses page
Login page
Nothing crazy here. Just a typical login page with the requisite login form, as shown in the wireframe below.
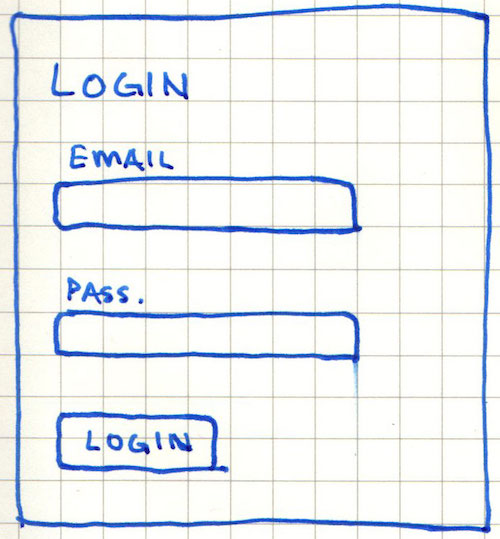
Login Page Wireframe
Account page
The account page will just include another simple form, allowing the user to view and update their basic information.
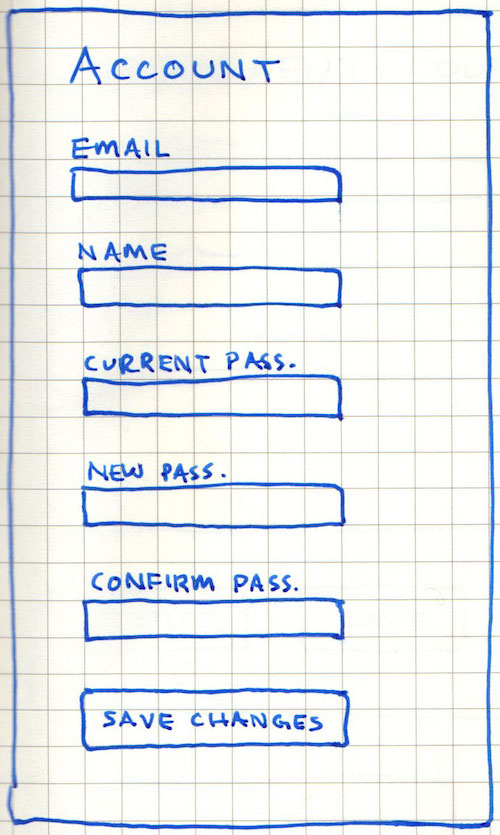
Account Page Wireframe
Reset Password page
Yet another simple page with another simple form, allowing the user to set a new password.

Reset Password Page Wireframe
Profile / “Your Courses” page
This page will include a simple list of the courses the user is subscribed to, each one linked out to the designated course’s Course Overview page.

Profile Page Wireframe
All set with user pages. Last, but not least, administration pages.
Administration pages
If by now this process seems a bit repetitive, that’s because it most certainly is.
But at the same time, notice how relatively easy it has been. And that’s almost entirely a result of our diligent preparation in creating the list of our application’s objectives.
To tackle our last set of pages, the administration pages, we again refer back to our list of objectives, specifically these two:
- Add/edit/delete courses
- Add/edit/delete lessons
The above items can be translated to the just two pages:
- A create/edit course page
- A create/edit lesson page
And since all four of those pages will be nearly identical, we can just create a single wireframe. (Note though that, technically, these will be four different “pages” in the app.)
Each page will need a form for creating/updating the course/lesson as well as a Delete button, to allow for the deletion of the item (if editing an existing item). The wireframe is shown below.
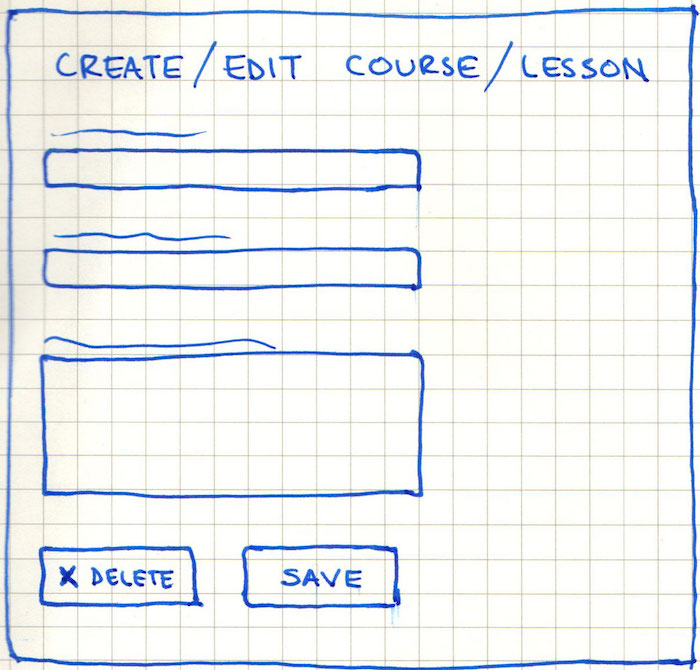
Create / Edit Course / Lesson Page Wireframe
One last thing
There’s one additional, minor aspect worth creating a wireframe for: the site header/navigation.
The header will need to appear in two different states: one for when a user is logged in, and one for when they are logged out.
When logged in, we’ll include the following (as shown in the wireframe below):
- A link to the user’s Account page
- A link to their Profile / Courses page
- A Logout link
-
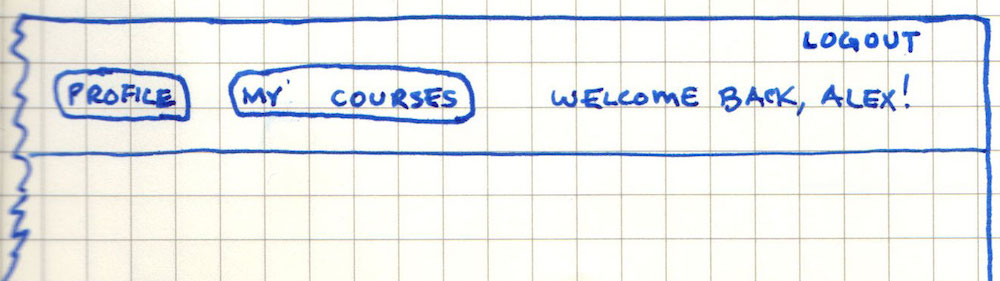
Logged-in Header Wireframe
And when they’re logged out? All we need to show is a Login button.
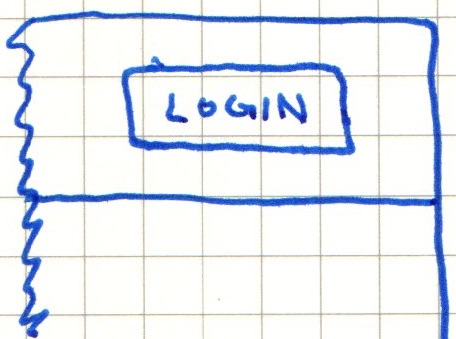
Logged-out Header Wireframe
The process in a nutshell
Again, notice how easy it was to go through our list of objectives and determine the pages our app needed to include. And from there, it was just a matter of giving a bit of thought and consideration to the contents of each page.
All of our pages were relatively straightforward, but the process was the same for generating each wireframe. We asked:
- What does this page need to do?
- What items need to be included to accomplish that?
- How can those contents be most effectively arranged?
What’s next?
We now have wireframes for every page that will be included in the web application.
Next time, I’ll show you how to design and build the app’s database. Stay tuned for that!
