This is lesson eight of a 10 ten-lesson course, Simple CodeIgniter App, which walks you through the creation of your first PHP web application using the CodeIgniter framework.
We’ve spent a few previous lessons establishing our database and learning how to retrieve information from it, and now, it’s finally time to complete the circle and actually display some of that data!
Ultimately, we’ll be creating a page to display a list of all of the todos in our database, as shown in the mockup below.

A mockup of the todos index page
The four essential pieces
When it comes to displaying actual data to a user in a web app, there are four pieces of the puzzle:
- a database, to store the data;
- a model, to represent the data objects and interact with the database;
- a controller, to retrieve the necessary data (leveraging the model(s)) and organize it;
- and a view, to actually render and display the data.
…which means we’re halfway there, as we already have a database and a model. Let’s go ahead and get all of the way there.
Creating a new controller
The very first thing we need to do is create a controller so that we can get access to the data our model is helping us retrieve.
Start off by creating a new controller for our todos in the application/controllers directory named todos.php with code here:
<?php if ( ! defined('BASEPATH')) exit('No direct script access allowed');

class Todos extends CI_Controller {


}
This code should look familiar, as it’s the same exact shell for the Welcome controller we worked with back in lesson 6.
As a refresher, see the figure below, which depicts how information flows through our web app via the MVC pattern.
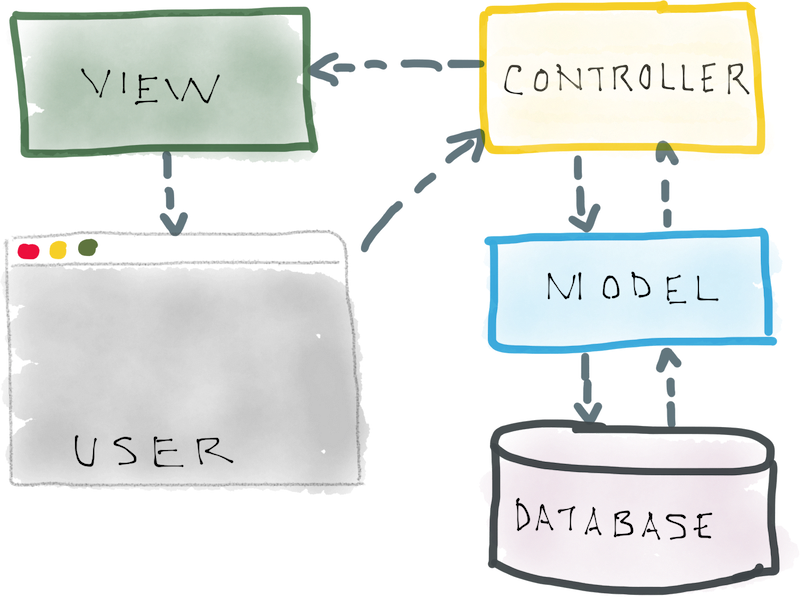
A diagram of the MVC pattern depicting the information flow between a user’s browser, and the controller, model, view, and database
Now we have our controller, but we still need to add a new action that can be associated with a specific URL, in order to eventually display our data on a page.
Adding a controller action
Now it’s time to create an action and start adding actual functionality to it. Go ahead and alter the controller’s code to include a new index action, as shown here:
<?php if ( ! defined('BASEPATH')) exit('No direct script access allowed');

class Todos extends CI_Controller {

  public function index()
  {
    // 1. Load the data:
    // 2. Make the data available to the view
    // 3. Render the view:
  }

}
As you can see based on the comments, there are three things we’ll need to do in our action: load the necessary data (via the Todo_model we established in lesson 7); make the data available to the view; load/render the view.
But before we can load our data from the Todo_model, we first need to create a way for our controller to communicate with our model, because right now, it doesn’t know how to do that.
Prerequisite: Loading our model
Just as in our model, in any controller in CI, you also have the ability to define a constructor that is executed every time the controller is accessed (such as when a user requests a page that’s managed by the controller).
Since our goal is to load our model and make it available to all of the controller’s actions (even though there’s only one, now), a constructor is exactly what we need.
Go ahead and add the constructor method to the top of the Todos controller, shown here:
<?php if ( ! defined('BASEPATH')) exit('No direct script access allowed');

class Todos extends CI_Controller {

  public function __construct() {
    parent::__construct();

    // Load the todo model to make it available
    // to *all* of the controller's actions
    $this->load->model('Todo_model');
  }
  .
  .
  .
}
The following line is responsible for loading the model:
$this->load->model('Todo_model');
And since it’s contained within the constructor, that means that all of our controller’s actions will have the ability to access it using $this->Todo_model, as we’ll see in just a minute.
Retrieving data via our model
By loading our model in the constructor, we can now access it within our controller actions using $this->Todo_model.
In our Todo_model, we previously created a function to retrieve all of our todos, aptly named get_all_entries, with the newest todos appearing first. Go ahead and add the following code to our index action, which utilizes that very function:
<?php if ( ! defined('BASEPATH')) exit('No direct script access allowed');

class Todos extends CI_Controller {
  .
  .
  .
  public function index()
  {
    // 1. Load the data:
    $all_todos = $this->Todo_model->get_all_entries();

    // 2. Make the data available to the view

    // 3. Render the view:

  }

}
As you may already be aware, the code we just added makes a call to the get_all_entries function in our Todo_model and stores the entries retrieved in a new $all_todos variable.
Preparing the data to be passed to the view
We have our todos stored in $all_todos. Great.
But how will our view be able to access the todos? That’s exactly what we’re going to address right now.
As you’ll see in step 3 when we load/render a view, we have the ability to pass it an array—a collection of items—that will be accessible within the view file itself. All we have to do, in preparation for loading our view, is create a new array, and add our todos to that array.
In order to accomplish that, add the following code to the index action:
<?php if ( ! defined('BASEPATH')) exit('No direct script access allowed');


class Todos extends CI_Controller {
  .
  .
  .
  public function index()  {
    // 1. Load the data:
    $all_todos = $this->Todo_model->get_all_entries();

    // 2. Make the data available to the view
    $data = array();
    $data['todos'] = $all_todos;

    // 3. Render the view:

  }

}
Our new $data array now contains our todos, and we’ll be able to pass it to our view when we load it.
Rendering the view and passing it the data
The final step required to complete our index action is to load the view. Add the code here to the action to complete its functionality:
<?php if ( ! defined('BASEPATH')) exit('No direct script access allowed');

class Todos extends CI_Controller {
  .
  .
  .
  public function index()
  {
    // 1. Load the data:
    $all_todos = $this->Todo_model->get_all_entries();

    // 2. Make the data available to the view
    $data = array();
    $data['todos'] = $all_todos;

    // 3. Render the view and pass it the data:
    $this->load->view('todos/index', $data);
  }

}
Up to now, we’ve only dealt with views, such as the welcome index view, that contain static information — just some HTML that doesn’t require any additional data from database, or anything of the sort.
This is the first time we’re dealing with a view that does require some dynamic data (i.e. from the database). And as you can see above, this is the first time we’re passing a second argument — the $data array containing our todos — to the load->view function.
The load->view function accepts two arguments: 1) the name of the view; and 2) an array of data to be made accessible within the view file:
$this->load->view('path-to-view-file', $array_of_data);
Wrapping up
As you may have noted from the title of this lesson, this is Part 1 of a two-part lesson on displaying our data.
Next week, we’ll actually be building our view, which will display all of our todos’ information. (And actually, you’re going to get started on that right now in this week’s task below!)
Week 8 Task
Create the initial todos index view
As mentioned, in the next lesson, we’ll be building out the full todos index view, but this week’s task is for you to create the initial view file and make sure you can access it.
You should:
1. Create the new view file in the views directory
Use the code in step 3 of the index action we created above as guidance for the name of view’s sub-folder and the view file’s name. (Remember, views can be stored in sub-folders to help with their organization. See “Storing Views within Sub-folders” in the CodeIgniter Views documentation for more information.)
2. Make sure you can access your new view in your browser
You should be able to access it via two different URLs. (Remember, index views are a bit special in that regard…)
Once you’ve completed the task leave a comment below with the two URLs you were able to use to access your new view.
We’re on the home stretch! As always, feel free to send me an email or leave a comment with any questions.