This is lesson 4 of the Mini Web App course, which walks you through the creation of a simple web application, covering HTML and CSS, PHP, Bootstrap, Local Storage, and more.
Up to now, we’ve certainly learned to do some cool stuff, but we haven’t been able to save any data (i.e. information associated with the page, such as our New Year’s Resolution list items’ names). And while it’s great to have the ability to make dynamic changes within a page (as we implemented with inline editing in Lesson 2), it becomes really powerful when those changes persist, or remain over time.
In today’s lesson, we’ll discover how to do just that: create a truly dynamic page, whose data, when updated, is saved.
Part 1: The importance of data storage and an introduction to Local Storage
In order to create a truly dynamic page — that is, one that is created based on real data, that can, and might, be altered at any given time — you must have data storage.
Data storage: At the core of dynamic pages
As we’ve discussed, and seen, in previous lessons, you can have simple static pages containing information that doesn’t change — such as a page on how you originally came to adopt your pet Gila monster.

That’s information that won’t likely change: you got the urge to adopt; you went to the zoo; arranged the adoption and signed the necessary paperwork; and took the Gila monster home.
But things really start getting interesting when we begin to build dynamic pages that contain data that can change, be manipulated, and be added to, at any given time — such as a page logging your pet Gila monster’s daily activities: on Monday he ate three small birds for dinner; yesterday, a dozen frogs; and who knows what he’ll have tonight.

Being able to store data is essential to the creation of a truly dynamic webpage or web application.
What’s meant by “data storage”?
Simply put, when I refer to data storage, I’m referring to some means by which to store and retrieve data. In web applications, data storage usually comes in the form of a database, but there are also other means (as you’ll see shortly).
At its core, data storage allows you to save pieces of information that still exist even after your browser has been closed.
In terms of a webpage or web application, that, seemingly simple, concept empowers you to implement all kinds of things you’re already familiar with such as: establishing user accounts with associated login credentials; storing user profile information; and creating connections between users, just to name a few.
Notice how the previous examples are all things you’ve probably seen when interacting with any modern-day web application, such as Facebook, Twitter, or the like.
All web applications require data storage, with very few exceptions. It’s really that simple. Without it, as you can imagine, most would be quite useless.
Basic explanation of how data storage works
To start, data flows between a page you’re viewing within your browser and the source of the data, in both directions.
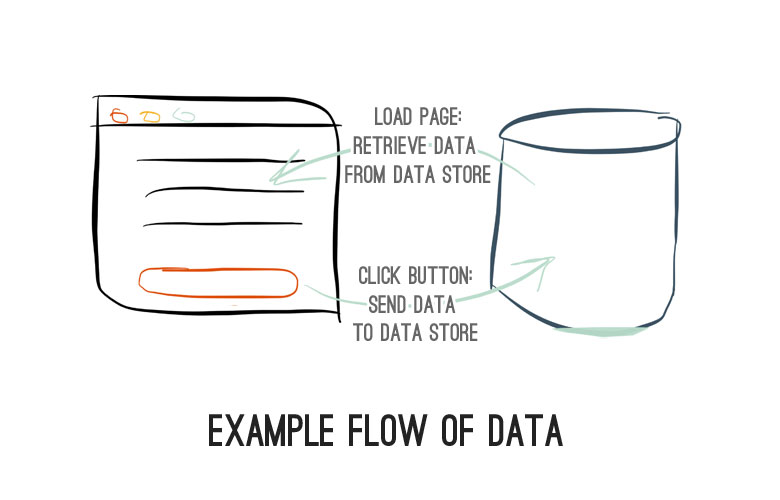
From data storage to page
Say you load up your Facebook News Feed in your browser. In that case, for example, all of your recent feed posts are retrieved from Facebook’s data storage so that they can be rendered on the page. From data storage to page.
From page to data storage
Now say you’re sending one of your Facebook friends a message. In that case, you enter the message and submit it, at which point that information is sent to Facebook’s data storage, to be stored (so it can be delivered to your friend). From page to data storage.
Again, notice how the flow of data goes both directions: user interaction → data sent; user interaction ← data retrieved.
Quick exercise: data storage interaction in a common web application
Let’s do a super quick exercise to drive the point home.
- Pick a web application that you’re familiar with (e.g. Facebook).
- Make a quick list (just in your head) of three different ways you interact with it (e.g. “Liking” a post)
- Now, for each item on your list, ask yourself: “Does this involve data interaction in any way?”
I’m willing to bet that all three items on your list most certainly do. In fact, you’d be hard pressed to come up with an action that doesn’t!
Introduction to Local Storage
Now, typically, in order to implement data storage, you’d have to install database software on a web server, configure everything, establish ways for your pages to communicate with it, etc.
But luckily for us, as opposed going through all of that, we can utilize a modern-day browser sort of “built in” database known as Local Storage.
At its core, a browser’s Local Storage is similar to a database: it allows us to store, retrieve, remove, and manipulate data, all directly within the browser — no database required.
But when it comes down to it, it’s really just a big key-value store (much like the PHP arrays with discussed in Lesson 3). You tell it “Hey, Local Storage! Store this string, "Hello, my name is" and associate it with the key, "introduction"!”. And it says, “Okay, sure. Done.”

And best of all, all of those communications can be done via JavaScript without any prior setup required. So, for example, you can insert a value:
localStorage.setItem("introduction", "Hello, my name is");
retrieve that value:
var intro = localStorage.getItem("introduction");
and then delete the value, when you’re done with it:
localStorage.removeItem("introduction");
It’s that simple. But just to be clear, there are multiple limitations to be aware of…
Limitations of Local Storage
First of all, Local Storage data is only stored locally, within your own web browser. It cannot be accessed via the outside world.
Secondly, you can only store strings in Local Storage — no other types of elements (although we’ll see in just a bit how to get around that limitation).
And finally, there aren’t nearly as many configuration options and ways to store data in, and retrieve data from, Local Storage.
But, with that said, as you’ll see, Local Storage can be extremely convenient, and if you’re aware of said limitations, it can still be quite a joy to work with.
Using JSON to store objects and arrays in Local Storage
As I mentioned, while you can only store strings in Local Storage, we can use our dear friend JSON — or JavaScript Object Notation — to help us, essentially, store objects and arrays, as well.
JSON is a standard format for representing data objects consisting of key-value pairs as strings. And since that’s essentially what objects and arrays are in JavaScript, it’s perfect for our scenario.
In fact, JSON strings look exactly like JavaScript objects. Take the following JavaScript object:
var bertObj = { "best_friend": "Ernie" };
Its corresponding JSON string is the following:
{ "best_friend": "Ernie" }
Exactly the same. And this, in turn, makes it very easy for us to store JavaScript objects and arrays in Local Storage.
With the help of two more functions built in to modern-day browsers, JSON.stringify() and JSON.parse(), that allow us to convert objects to JSON strings, and vice versa, respectively, it’s a breeze.
In this example, you can see how a JavaScript object is created; converted to a JSON string; inserted into Local Storage; retrieved back from Local Storage (as a string); and finally converted back into an object:
// Original object
var bertObj = {"best_friend":"Ernie"};

// This is a JSON string that is fit
// to be inserted into localStorage
var bertJSONString = JSON.stringify(bertObj);

// We can then save the string into localStorage
localStorage.setItem("bert", bertJSONString);

// And if we were to *retrieve* it again,
// we can do so, and then convert it back to an object
// (Note that bertObjFromLS will be exactly the same as bertObj)
var bertJSONStringFromLS = localStorage.getItem("bert");
var bertObjFromLS = JSON.parse(bertJSONStringFromLS);
Advantages of using a true database (over Local Storage)
While Local Storage is quite convenient, most dynamic web applications in the real world will still use actual databases.
They allow you to house data that can actually be shared with, and displayed to, others; it’s not restricted to your browser, as is the case with Local Storage.
Databases also provide you with the ability to store multiple types of information, such as numbers, dates, and more, as opposed to Local Storage where we can only store strings.
And databases also afford you many additional, useful ways of storing, organizing, and retrieving you data, compared to Local Storage.
But for our sake, Local Storage is perfect.
It doesn’t require any prerequisite setup (as it’s built directly into the browser); no software installation or configuration is required; and it’s easy to access and interact with via simple JavaScript.
It’s, in fact, I believe, the perfect way to get a taste of truly dynamic data.
Part 2: Adding dynamic data to our New Year’s Resolutions list with Local Storage
Now you may very well have seen where this is going: we can use Local Storage to implement actual dynamic data storage into the New Year’s resolution list we’ve been building over the previous lessons (see Lesson 1; Lesson 2; and Lesson 3).
But what does that mean, exactly? It means, for example, that when we add a new resolution item via the form at the bottom of our page, it will actually be stored as data, so even after the “Webpage Preview” is refreshed, it will still appear.
As opposed to creating elements with static HTML code, we’re going to alter our list to store and retrieve them from our Local Storage data store.
Note that you only need to make changes to the JavaScript code for this lesson. The HTML code is shown for your reference, but editing it is disabled, as you won’t need to make any changes to it.
Resources (in the order of appearance)
As always, below you’ll find the list of resources, by step, to help you progress through the exercise:
Step 1
Step 2
- jQuery
.each() - JavaScript string concatenation (“The + Operator Used on Strings)
- jQuery
.append() - jQuery $(document).ready()
Step 3
- JavaScript objects syntax
- JavaScript array push()
- Updating Local Storage values
(see Step 1 resources)
Step 4
- JavaScript create empty object
(see Step 3 resources) - JavaScript array push()
(see Step 3 resources) - jQuery selectors
- jQuery
$(selector).each() - Updating Local Storage value
(see Step 3 resources)
Step 1: Retrieve items to display from localStorage
Remember, as mentioned previously, localStorage can only store strings. Luckily, using the browser's built-in JSON function we discussed earlier, we can store a string representation of an array of items.
I've taken the liberty of pre-populating your localStorage with an array containing a few resolution itemss that we can use to populate our list with, to start; the string representing the items is stored in localStorage under the key
"resolutions".At the top of your JavaScript code editor, begin by: retrieving that string; parsing it to create an object/array from the string; and store that object in a variable named
resolutions.To confirm that the string was parsed properly and actually contains our resolution items, again use the browser's built-in functionality, but this time to convert our object back into a string. Then add a alert message statement that displays the contents of string, to make sure its contents are what we expect.
We'll remove the alert message and actually put our newly-retrieve object to good use in the next step...
JSON.stringify and JSON.parse can be used to convert an object to a string and convert a string to an object, respectively.
var resolutions = JSON.parse(localStorage.getItem("resolutions"));
alert message should appear similar to the following:
var resolutions = JSON.parse(localStorage.getItem("resolutions"));
alert(JSON.stringify(resolutions));
Step 2: Populate the list using the items retrieved from localStorage
You can start off by deleting the alert message functionality from before -- we won't be needing that anymore.
Next, define a new function in your JavaScript editor (below where you retrieved the items from localStorage) called
addAllResItems that accepts one parameter, resolutions. We'll be using this function to loop through our resolution items and append them to our page. Within the function, use jQuery's $.each() to loop through the resolutions, and, within the loop, make a call to a function, renderResItem (which we'll be creating in just a minute), passing it the current resolution item.Now we need to define the
renderResItem function, which will be responsible for actually creating and adding HTML elements to our page for each of our resolution items.Define the new
renderResItem function directly below the previous addAllResItems within the JavaScript editor, having it accept one parameter, resItem. (If you've been following along, you may notice that this function is shaping up to be very similiar to one we wrote in PHP in Lesson 3, and you'd be exactly right...)Within the function, create a variable,
resItemHTML, that contains a string of the HTML representation of a resolution item in the following format:
<li><div>item-name</div><input type="text" /></li>
resolution_list list already present on our page.There's only one thing left to do: call our
addAllResItems function so that our resolution items are actually added to the page! There's one caveat to consider: we need to make sure that the page's HTML is fully loaded before we go about interacting with its preexisting HTML elements. Luckily, jQuery makes this very easy; any JavaScript code that needs to interact with existing HTML can be wrapped in a $(document).ready() call, like so:
$(document).ready(function() {

  // Code for interacting with existing HTML goes here!

});
$(document).ready() definition, and inside of it, make a call to the addAllResItems() function, making sure to pass in our resolutions object that we retrieved from localStorage. $.each() like so:
var heroes = [
  { "name": "Chewbacca" },
  { "name": "Mr. Clean" },
  { "name": "Captain Planet" }
];

// This would produce an alert message
//  with the name of each hero
$.each(heroes, function(index, hero) {
  alert(hero["name"]);
});
index represents the item number (starting at 0) and hero represents the current element.
<div id="my_container"></div>
p element to it using the following JavaScript code:
var newP = "<p>I will be inside of my_container</p>";
$("#my_container").append(newP);
localStorage.setItem("item", "new-string-value");
var resolutions = JSON.parse(localStorage.getItem("resolutions"));

function addAllResItems(resolutions) {
  $.each(resolutions, function(index, resItem) {
    renderResItem(resItem);
  });
}

function renderResItem(resItem) {
  var resItemHTML = '<li><div>' + resItem["name"] + '</div><input type="text" /></li>';
  $("#resolution_list").append(resItemHTML);
}

$(document).ready(function() {

  addAllResItems(resolutions);

});
Step 3: Store new items created via the form in localStorage
You may notice a few small changes, including the use of the .on() function, which ensures actions are applied to all applicable items, even if they're added to the page after it was loaded.
We're going to start by modifying our $('#add_resolution').click() functionality. Since we now have a new renderResItem responsible for adding new resolution items to our page, we might as well use it!Remove the current code in that
click() function, and start by creating a new variable, resItem, that contains an object representing the resolution item with just one value for its "name".Then, simply make a call to
renderResItem, passing it the resItem object, which should take care of adding the list item element for our new resolution.Now we need to add our new resolution item object to our current
resolutions object and then update the string stored in localStorage. After the call to renderResItem, add a line that adds (or, hint: pushes) the new resItem object to the end of our resolutions array. And finally, using the built-in JSON functionality, turn the resolutions object into a string, and update the localStorage "resolutions" element to store that string.
var car = { "make": "Volkswagen", "model": "Vanagon" };
var vdubs = [
  { "make": "Volkswagen", "model": "Rabbit" },
  { "make": "Volkswagen", "model": "Corrado" }
];
var newCar = { "make": "Volkswagen", "model": "Vanagon" };
vdubs.push(newCar);
$('#add_resolution').click() should appear similar to the following:
$('#add_resolution').click(function() {
  // Add the new resolution HTML element
  var resolutionName = $("#resolution_name").val();
  var resItem = { "name": resolutionName };
  renderResItem(resItem);

  // Update localStorage to include the new resolution item
  resolutions.push(resItem);
  localStorage.setItem("resolutions", JSON.stringify(resolutions));
});
Step 4: Dynamically save items when their names are edited
In order to handle that situation, and make sure our resolutions are being properly updated in localStorage, we'll need to a create a new function that: 1) creates a new, empty array to store our updated items; 2) retrieves all of the resolution HTML list item elements; 3) loops through them, adding an entry to our new array for each item; and 4) updates the localStorage entry containing our resolutions' info.
You've already performed all of those tasks previously, it's just a matter of piecing them together in a slightly different way. Start by creating a new function named
updateResolutions. At the top of that function, create a new variable, resolutionsUpdated, with an empty array.Next, use jQuery to retrieve the collection of
li list items within our resolution_list list.Using jQuery's
$(selector).each() function, loop through the elements. Inside the loop, begin by using jQuery to extract the item's name (remembering that you can use this to reference the current list element inside of the loop). Then create a new resItemUpdated object containing the resolution's name, and add that item to the resolutionsUpdated object.Almost there! The last thing to do within our function is update our localStorage value. After looping through the items to form the new collection, update the localStorage "resolutions" value with the new resolutions' info from our
resolutionsUpdated array, remembering to convert it to a string, first.And finally, add a call to
updateResolutions at the bottom of the existing blur() for our text input elements.
var emptyArr = [];
var $listItems = $("#my_list li");
$listItems.each(function() {

});
this keyword, and, say, create an alert message with the text of a div element contained within each:
var $listItems = $("#my_list li");
$listItems.each(function() {
  var $innerDiv = $(this).find("div");
  var divText = $innerDiv.text();
  alert(divText);
});
updateResolutions function should look like this:
function updateResolutions() {
  // Loop through the resolution items,
  // adding each to a new array
  var resolutionsUpdated = [];
  $("#resolution_list li").each(function() {
    var resName = $(this).find("div").text();
    var resItem = { "name": resName };
    resolutionsUpdated.push(resItem);
  });

  // Update the resolutions in localStorage
  // using the new array of updated items
  localStorage.setItem("resolutions", JSON.stringify(resolutionsUpdated));
}
blur() function like this:
$(document).on('blur', '#resolution_list input', function() {
  var listItem = $(this).parent();
  var nameDiv = listItem.find("div");
  nameDiv.text($(this).val()).show();
  $(this).hide();

  updateResolutions();
});
Part 3: Putting your new skills into action
As with every lesson, the goal is to provide you ways to put your new knowledge and skills into action, and further them, through continued practice.
Here are a few ways to do so, incorporating knowledge and skills from all of the Mini Web App lessons thus far.
Expand the New Year’s Resolution list functionality
Below are a few ways you can expand the current New Year’s Resolution list functionality, putting your new skills into action. You can download the completed code files (as they would be after completing the exercise, above) as a starting point.
Re-implement support for item descriptions
You may have noticed that descriptions were removed from the list items in this lesson’s exercise. Try re-implementing them, being sure to consider their presence in the following scenarios: when loading the items initially; when inserting a new item; when updating the resolutions in Local Storage.
Re-implement drag-and-drop reordering and allow saving of resolutions in order
You may have also noticed that drag-and-drop reordering was also removed. Re-implement it, and, upon reordering, update the resolutions stored in Local Storage to reflect their new order. (Note: Use the jQuery UI sortable documentation to help you out.)
Add “completion” designation to the items
Add checkboxes to each item that designate whether or not the resolution has been completed. When a checkbox is checked, add a new CSS class to the item that “dims” it (hint: use CSS opacity). Additionally, make sure to update the arrays and Local Storage so that the items’ data being stored in Local Storage includes a “completion” designation for each item.
And likewise, when a complete item is unchecked, undim it, and, again, update the data stored in Local Storage.
Build a mini activity journal application
If you really want to get your hands dirty, try creating this new mini activity journal application from scratch that will certainly require a good deal of the knowledge that you’ve learned thus far in this, and all of the previous, lessons: Lesson 1 — HTML and CSS; Lesson 2 — JavaScript and jQuery; and Lesson 3 — Foundational Coding Concepts and PHP.
The goal is to create an application that you could use to keep a simple journal of your daily activities. Here are some specifications, but feel free to try building it without including everything right off the bat; you can always add additional functionality after the fact.
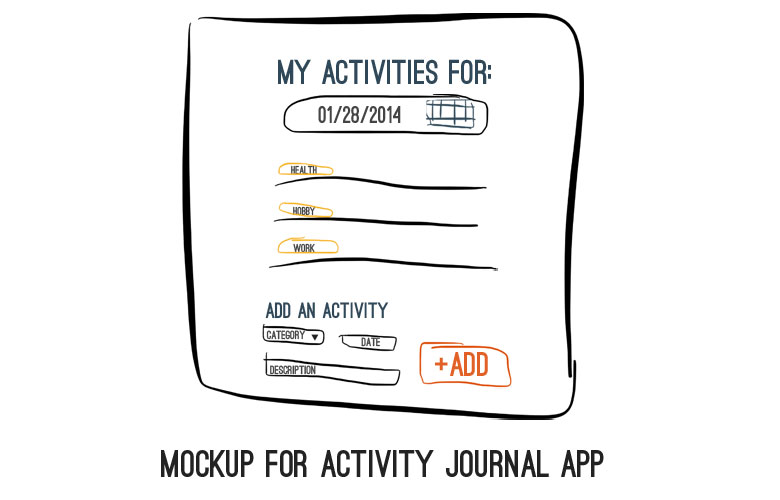
- Establish a list of categories (hobby, work, general, fitness, etc.) that each activity can be assigned to
- Implement the ability to add an activity with:
- description
- date (using jQuery UI datepicker)
- category
- Add the ability to display a list of the activities that you’ve logged for a specific date, via changing the value of a date
inputelement (again, using jQuery UI datepicker) - BONUS: In addition to being able to change the date you’re viewing activities for, add a “Today” button that, when clicked, will show you today’s activities
Happy coding!